It’s Sale Saturday! Now that Sale-A-Bration is finished there’s not much on sale.
The Clearance Rack will be refreshed in the middle of the month. I thought I would tell you so you have something to look forward to.
I also need to remind you that this is the LAST day for the Stamp of the Week Class! If you have not seen the details on this class centered around the Ornate Garden Suite then please go to https://stampingwithjoni.wordpress.com/stamp-of-the-week/. Tell me today by 7:30 pm if you would like to join in to create these 9 projects. This class starts at $35.
It’s Friendship Friday! This is the day to focus on giving back or paying it forward.
Most days my focus for this blog post is what we can do to help others. Today is a bit different. I want to focus on mental well-being.
With all of us living at home and missing social interaction it’s okay to grieve. It’s okay to wish for “normal” to come back. Just remember that everyone processes differently and sometimes the cycles repeat.
So instead of getting together maybe you mail an extra card. Maybe you make one extra phone call and check on someone. And maybe you’re the one that needs someone to check in on you. Know when to ask for help. If you feel that things are closing in on you do not wait until you are so far down the hole that you can’t see the sky any longer. Ask for help.
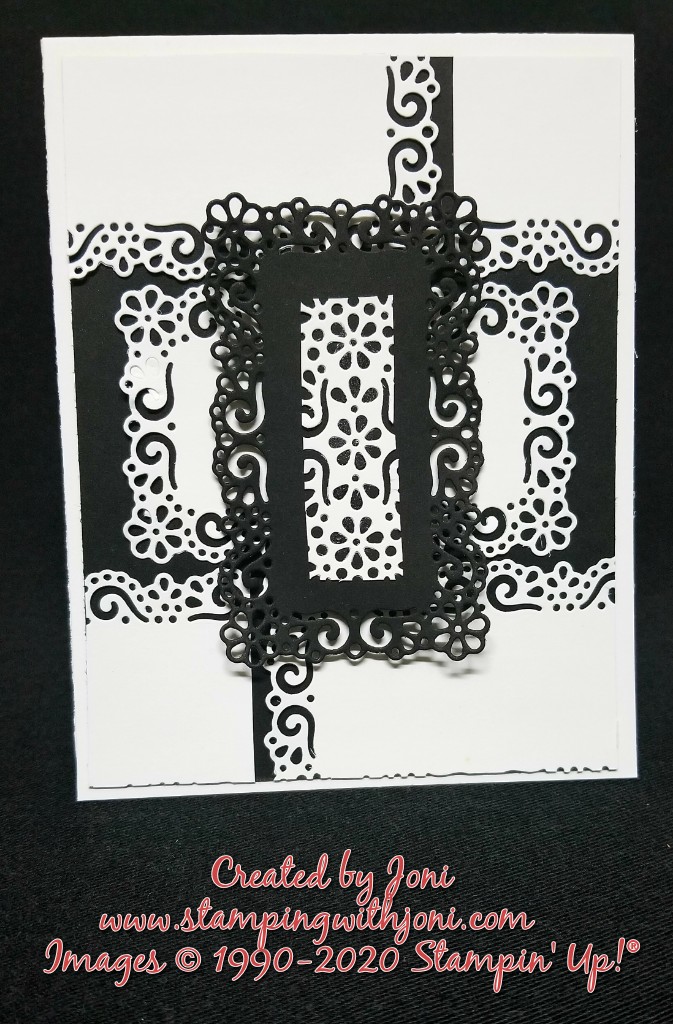
It’s Tutorial Thursday! Today is the day I am creating a background from several cut out die labels from the new Ornate Garden Suite.
Take a piece of Thick Whisper White Card Stock and cut with a Paper Trimmer to 4 1/4″ X 11″. On the 11″ side score at 5 1/2″. This is your card base.
Take a piece of Basic Black Card Stock and cut to 4″ X 5 1/4″. This is your mat. Do not attach to the card base at this time.
Cut 4 filigree labels from Ornate Layers Dies. Cut one label in half by Snips or Scissors. Attach with Snail Adhesive to the black mat. Trim edges off with Snips.
Attach accent piece of white label with black insert with Dimensionals.
It’s Wacky Wednesday where a product is used in a way it is not intended!
Do you ever wish you could have one of those elegant backgrounds for your cards? You probably already have it and you don’t even know it. Take a tag, label, die, or framelit and cut it several times to create your background. Then glue in a random pattern to create a backdrop worth having.
To see more about this technique please join me tonight on my Live at 7 pm to see how this is done.
It’s Management Monday! Here’s what’s happening this week.
You should have gotten an email from me for the first Stamp of the Week online class. This class has several different options and quite a bit of product. Check it out…https://stampingwithjoni.wordpress.com/stamp-of-the-week/. If you don’t want to order this class please forward to a crafty friend that might. If someone new orders it counts for a referral, a pack of gems, and a $10 bonus coupon for your next order.
Card Class has been canceled for this month.
There will be another Stamp of the Week from Monday, April 13 through Saturday, April 18.
It’s Sabbath Sunday! This is the day we usually rest and recharge.
I don’t know about you, but I am about done resting. I am recharged and ready to go so tell that nasty virus I want to come out and play. Since that probably won’t work, instead I will keep working and planning ahead. So could you use some help for Easter?
I bet if you have kids and have been inside with them constantly you are probably re-thinking buying candy for their Easter basket. So here are some ideas to fill their basket with no candy.
Crafting supplies, of course (Bet you didn’t see that one coming.)
Stickers
Balloons
Glow sticks
Temporary tattoos
Toy cars
Bracelets, rings, or earrings
Bouncy balls
Whistles
Jumprope
Slap bracelets
Bubbles
Silly putty
Money
Books
Gift card for after you can go out again
I hope this helps.
Happy Crafting!
With inky fingers,
Joni 🙂
P.S. I have gift certificates if you want them to pick.
It’s Sale Saturday! I received through some supply orders a few bonuses for Sale-A-Bration and I want to offer these to you. I have two different offers for you.
The first offer is if you order the Ladybug Dies I will give you the Little Ladybug Stamp Set for FREE! I have two of these so the first two crafters will get them.
The second offer is if you order $50 or more you will get your choice of a 6X6 stack of the Flowering Foils Specialty Designer Series Paper (2 packs available), Lily Impressions Designer Series Paper (1 pack available), Golden Honey Specialty Designer Series Paper (1 pack available), or So Very Vellum Specialty Designer Series Paper (1 pack available).
To qualify you will need to order online at http://jonidaniel.stampinup.net and use the host code KVCNCBCQ in which Iris is the host. If your order is over $50 it also qualifies for reimbursed shipping. Your order needs to be submitted by March 31 at noon.
Happy Crafting!
With inky fingers,
Joni 🙂
P.S. I am offering these bonuses personally to finish this Sale-A-Bration season with a bang. I hope you enjoy!
It’s Friendship Friday! This is the day to focus on giving back or paying it forward.
Since most of us have some extra time to do some thinking right now, have you? Have you been reading some self help books? Taking some extra time for some self care?
This quote came up when I was googling the term “give back”.
What does this mean to you?
For me it is a simple reminder to treat each day as something special. Each day that I wake up is another someone else may not have gotten. Each day I have a chance to make a difference which is not only a choice, but also my duty as I take up space on this planet. So what impact are you looking for or creating today?
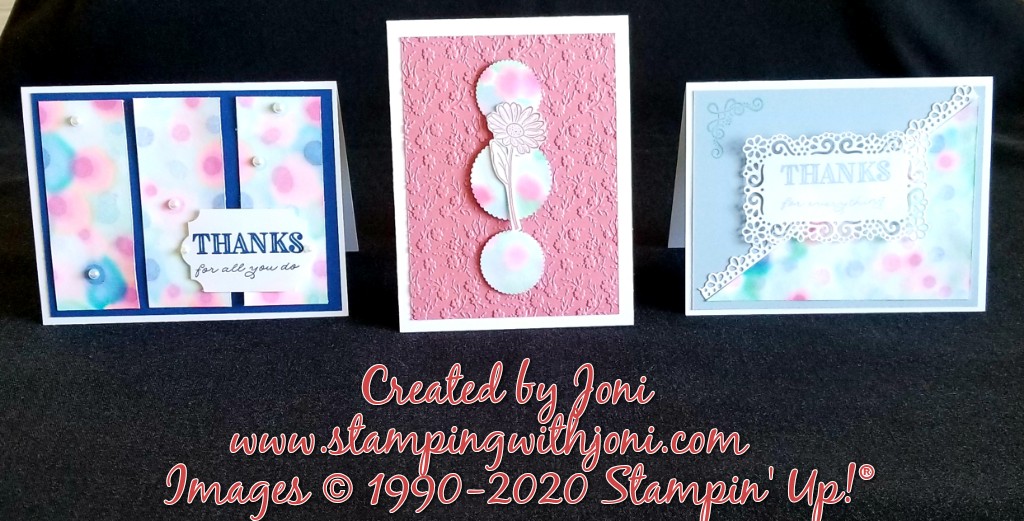
It’s Tutorial Thursday! Today I am giving you directions on how to create three cards all with the same technique called the drip. For this technique you will need a card base, mat, a piece of white card stock, scrap of card stock for words, aqua painter (paint brush and water), and adhesive.
For the card on the left…
Cut Thick White Card Stock to 5 1/2″ X 8 1/2″. On the 8 1/2″ side score at 4 1/4″. This is your card base.
Cut Blueberry Bushel Card Stock to 5 1/4″ X 4″. Attach wish Snail Adhesive to your card base. This is your mat.
Cut Whisper White Card Stock to 5″ X 3 3/4″. Drip ink and water droplets from Aqua Painter to create background. Let dry overnight. Then trim to create background and glue with Snail Adhesive.
Stamp sentiment in Blueberry Bushel ink and punch out. Adhere with Dimensionals.
Attach pearls.
For the card on the right…
Cut Thick White Card Stock to 5 1/2″ X 8 1/2″. On the 8 1/2″ side score at 4 1/4″. This is your card base.
Cut Seaside Spray Card Stock to 5 1/4″ X 4″. Adhere with Snail Adhesive. This is your mat.
Cut Whisper White Card Stock to 5″ X 3 3/4″. Drip ink and water droplets from Aqua Painter to create background. Let dry overnight. Then cut in half to create background and glue with Snail Adhesive.
Cut border with coordinating dies from Ornate Garden Suite (available April 1). Attach with Snail Adhesive.
Stamp accent with Seaside Spray ink in top left corner.
Stamp sentiment with Seaside Spray ink and cut out with coordinating die. Attach with Dimensionals.
For the card in the middle…
Cut Thick White Card Stock to 4 1/4″ X 11″. On the 11″ side score at 5 1/2″. This is your card base.
Cut Rococo Rose Card Stock to 5″ X 3 3/4″. Run through embossing folder in Ornate Garden Suite. Attach with Snail Adhesive. Tip: Go a little slower with the adhesive so the paper does not tear. This is your mat.
Cut Whisper White Card Stock to 5″ X 3 3/4″. Drip ink and water droplets from Aqua Painter to create background. Let dry overnight. Then punch or die cut to create background and attach with Dimensionals.
Take a scrap of Whisper White Card Stock and stamp a single daisy in Lovely Lipstick Ink. Cut out with Snips. Attach with Glue Dots.