
It’s Tutorial Thursday! Today I am giving you directions on how to create three cards all with the same technique called the drip. For this technique you will need a card base, mat, a piece of white card stock, scrap of card stock for words, aqua painter (paint brush and water), and adhesive.
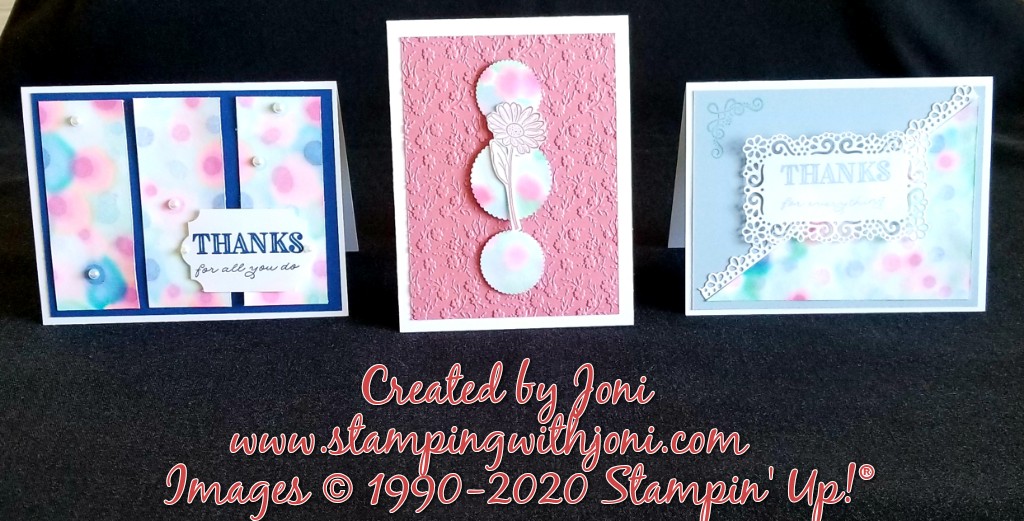
For the card on the left…
- Cut Thick White Card Stock to 5 1/2″ X 8 1/2″. On the 8 1/2″ side score at 4 1/4″. This is your card base.
- Cut Blueberry Bushel Card Stock to 5 1/4″ X 4″. Attach wish Snail Adhesive to your card base. This is your mat.
- Cut Whisper White Card Stock to 5″ X 3 3/4″. Drip ink and water droplets from Aqua Painter to create background. Let dry overnight. Then trim to create background and glue with Snail Adhesive.
- Stamp sentiment in Blueberry Bushel ink and punch out. Adhere with Dimensionals.
- Attach pearls.
For the card on the right…
- Cut Thick White Card Stock to 5 1/2″ X 8 1/2″. On the 8 1/2″ side score at 4 1/4″. This is your card base.
- Cut Seaside Spray Card Stock to 5 1/4″ X 4″. Adhere with Snail Adhesive. This is your mat.
- Cut Whisper White Card Stock to 5″ X 3 3/4″. Drip ink and water droplets from Aqua Painter to create background. Let dry overnight. Then cut in half to create background and glue with Snail Adhesive.
- Cut border with coordinating dies from Ornate Garden Suite (available April 1). Attach with Snail Adhesive.
- Stamp accent with Seaside Spray ink in top left corner.
- Stamp sentiment with Seaside Spray ink and cut out with coordinating die. Attach with Dimensionals.
For the card in the middle…
- Cut Thick White Card Stock to 4 1/4″ X 11″. On the 11″ side score at 5 1/2″. This is your card base.
- Cut Rococo Rose Card Stock to 5″ X 3 3/4″. Run through embossing folder in Ornate Garden Suite. Attach with Snail Adhesive. Tip: Go a little slower with the adhesive so the paper does not tear. This is your mat.
- Cut Whisper White Card Stock to 5″ X 3 3/4″. Drip ink and water droplets from Aqua Painter to create background. Let dry overnight. Then punch or die cut to create background and attach with Dimensionals.
- Take a scrap of Whisper White Card Stock and stamp a single daisy in Lovely Lipstick Ink. Cut out with Snips. Attach with Glue Dots.
For a video on how to create this background please go to https://youtu.be/7UmHOIHyDrk.
Happy Crafting!
With inky fingers,
Joni 🙂

Thank you. This is awesome. I plan on making the 3 panel one.
LikeLike
Awesome!
LikeLike