It’s Wacky Wednesday where a product is used in a way it is not intended!
What do you do with the pieces of Designer Series Paper that you don’t like? Do you share with a friend or do you wait for a shooting star to give you an idea? Well, consider me a shooting star today. 🙂
The pieces of Designer Series Paper that are too busy for me I often break up into smaller pieces. I’ll cut them out to make accent pieces or I’ll simply make them smaller pieces so they don’t look so busy.
When cutting just make sure you cut 1/4″ to 1/2″ smaller than you want. This gives space between the pieces.
I simply used the Paper Trimmer and cut at an angle.
It’s Technique Tuesday! Instead of talking about cards or projects today I want to ask you what you do to get unstuck. You know that creative block that happens? What do you do to get your creative mojo flowing again?
Here are some ideas to help you get going again creatively.
When you are in a store and something catches your eye take a photo of it. If it has interesting colors or a layout that you are drawn to you might be able to use that same styling for your crafting.
Look on Pinterest. Don’t look at who you are following but just your home feed so you get new ideas.
Take a break. Take a walk. Have a cup of tea. Read a book.
Look at past projects.
Browse your catalog. There are so many ideas in there as well as the great product.
Take a crafting class, virtually or in person.
Thumb through a magazine to get new ideas for color or layouts.
Think of what holidays, birthdays…card occasions…are coming up and create for them.
I hope this gives you some ideas to get going if you are stuck.
It’s Management Monday! Here’s what’s happening this week and maybe a bit beyond.
Open Day Session
Come on out to finish your Christmas cards, stop by and say hello, ask questions, or pick up an order. If you’ve been wanting something online and don’t want to pay the shipping this is when you can pick up too. Please, if there is preparation or you want something pulled for you, let me know ahead of time. Otherwise there is no need to RSVP.
December Online Craft Class
Club Order Bonus
For this Club from November 1-15 order $50 or more in product with host code 3JSJVY4R or using the link https://www.stampinup.com?hostcode=3JSJVY4R to qualify. (You can also place your order directly with me but it will not be submitted until November 16.) There is no commitment unlike past Clubs. There is simply a bonus. To read more details about Club please go to https://stampingwithjoni.wordpress.com/cluborderbonus.
Online Shopping
My retired stamp sets are now available online! There is not an option for local pick up except during the Open Day Session.
I will also no longer be doing the BOGO sale in May. All sets will be online from now on.
Are you missing in-person classes? Well, now you can choose everything. When you choose to be a host you get to pick exactly what you want: your location, your food, your projects, and your free products.
So let me know where I am going and when. I look forward to what ideas you have to share with me!
It’s Sabbath Sunday! This is the day to rest so you can be recharged for the week.
Sometimes the way to rest is to take care of yourself. And sometimes that means noticing you have a problem and fixing it yourself. Lately I have been having some foot problems. Now it took me a while to figure out that it was my shoes that had gotten old and not that I had injured myself. So I recently bought a new pair of tennis shoes.
Sometimes self care means resetting and starting over.
The Deal of the Day for this week’s Farmers’ Market is to purchase any two adhesives online at https://www.stampinup.com?hostcode=3JSJVY4R or in person on Saturday and get a pack of Dimensionals for FREE! This deal will run through Monday the 7th.
It’s Friendship Friday! This is the day to focus on giving back or paying it forward.
Most days I focus on what I can do for others. We have talked about Operation Gratitude, local volunteering, and so much more. But sometimes things hit right at home.
So I think you all know that my beloved Shadow passed on September 17. I was doing fairly well in processing and getting over things. And then Joel (hubby) decided to put out a video to give tribute to him. Not only did this whole thing hit all over again but I also realized how little my daughter, Tara, was. It showed her growing up with my precious poodle.
I want to share this with you. So enjoy watching my two precious ones growing up together.
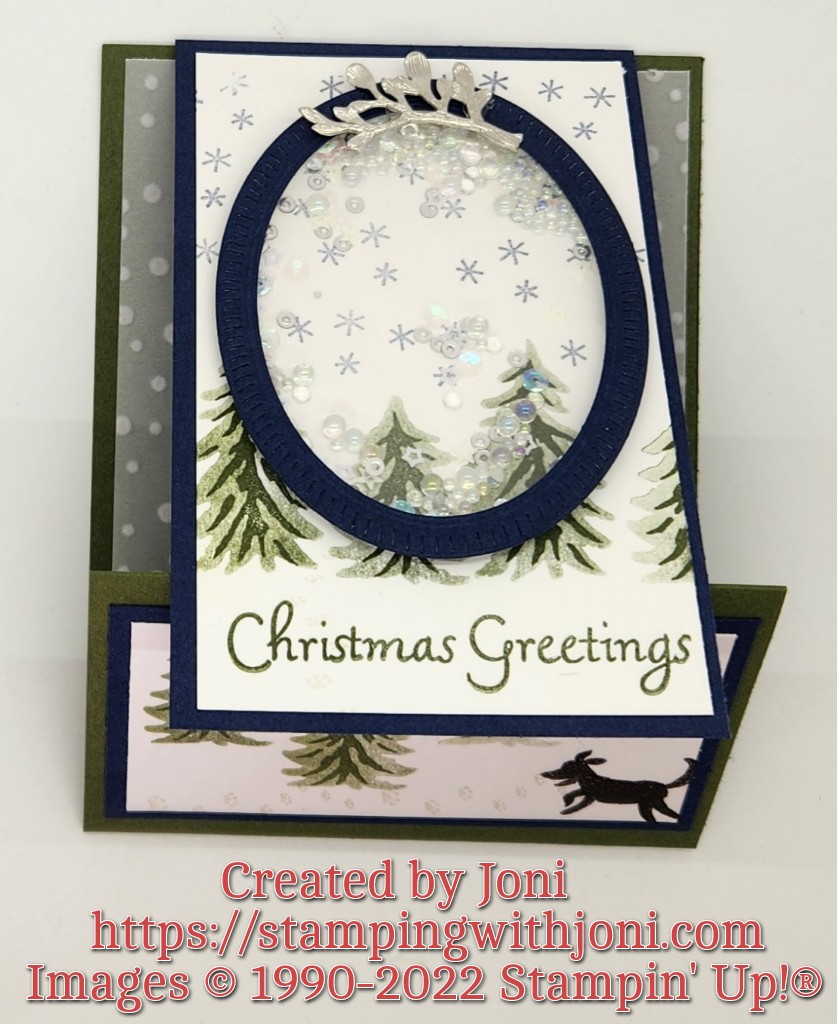
It’s Tutorial Thursday! Today I want to show you how to create an original card. Yes, original. I am calling this a Shaker Flip Gift Card.
For the card base cut the Mossy Meadow Card Stock with the Paper Trimmer to 4 1/4” X 10”.
On 10” side scored at 5 ½” & 8 ¼”.
Notch out the very bottom with 1” circle punch for gift card.
For the inside of the card:
Cut the Snowflake 12” X 12” Specialty Vellum to 5 ¼” X 4”.
Glue only in middle with Stampin’ Seal.
Cut the Basic White Card Stock cut to 3” X 4 ¾”.
Stamp “so very merry” in Night of Navy Ink.
Stamp tree with Mossy Meadow Ink.
For the flap:
Cut the Night of Navy Card Stock to 3 ¾” X 2 ¼”
Cut the Basic White Card Stock to 3 ½” X 2”
Stamp trees (Mossy Meadow), paw prints (Sahara Sand), and dog (Early Espresso)
Tear & Tape up both sides for the gift card pocket.
For the Shaker sleeve:
Cut Night of Navy Card Stock to 3 ¼” X 10”.
Score on 10” side at 5”.
Cut Basic White Card Stock to 3” X 4 ¾” (three times)
For the front – stamp Christmas Greetings in Mossy Meadow ink, Trees in Mossy Meadow Ink, and snowflakes in Night of Navy Ink.
For the Shaker you will need – Night of Navy oval, window sheet with larger oval, filler, Sprig Trinkets, Sparkle & Shine Sequins Assortment, Effervescent Elements, Foam Adhesive Strips, and Mini Glue Dots.
For the Back – stamp “you light up the season” in Night of Navy Ink and lights in Balmy Blue Ink.
Bend both stamps to get the curves needed.
If you prefer to see this card in action please go to https://youtu.be/j71Xl8zB1e8. Comment, please, and let me know if you have any questions or any feedback you wish to give.
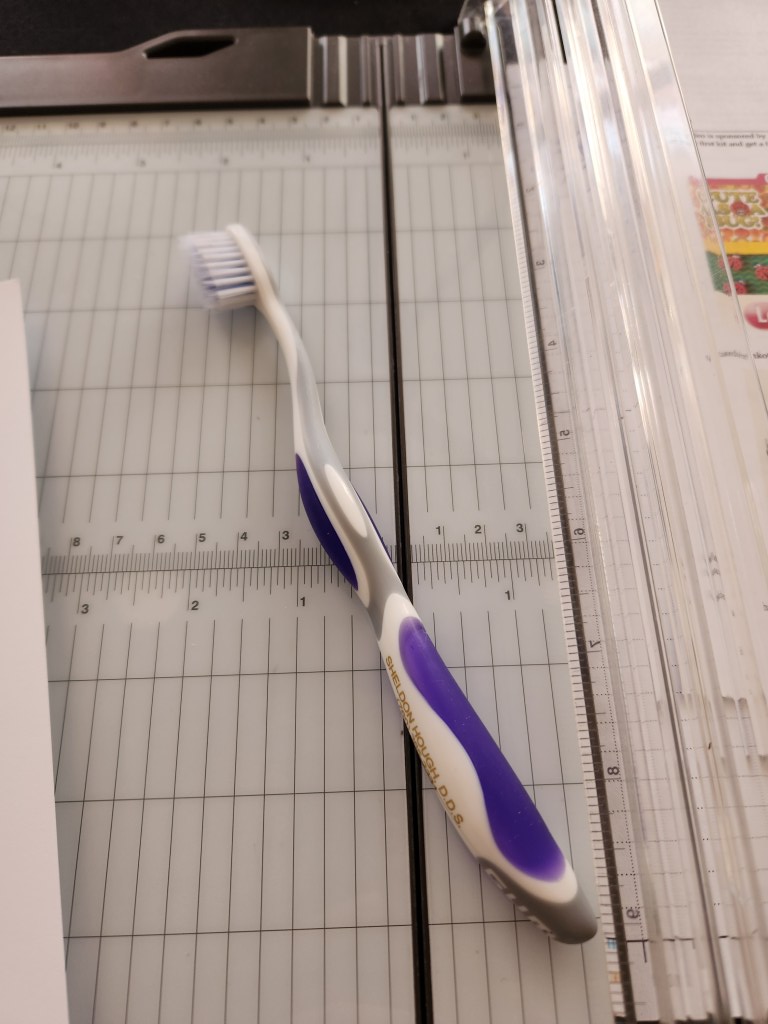
It’s Wacky Wednesday where a product is used in a way it is not intended!
Usually I talk about Stampin’ Up! products being used in a different way, but today I want to take a normal household object and show you how to use it differently. Grab an old, but clean, toothbrush. Keep it on hand near your Paper Trimmer. This will allow you to easily clean the track or groove of your Trimmer.
It’s Technique Tuesday! Today I want to show you how to glue vellum without a trace of adhesive.
Take a piece of scrap card stock, silicone mat, or a piece of waxed paper and spread some Multipurpose Glue on it. Then grab a sponge or Sponge Dauber and wipe until the glue is in one thin sheet. You can then spread the thin sheet on to the vellum without it being seen. But, you have to work fast because this glue dries quickly when spread thin.