It’s Friendship Friday! This is the day to focus on giving back or paying it forward.
There are so many groups on Facebook that I can’t even begin to start telling you about all of them. But I can tell you about one of them.
Did you know that you could look up groups by topic as well as by area? If you do not live in the Morongo Basin I would encourage you to research “pay it forward” groups in your area.
For the Morongo Basin I am sure there are several groups specifically to help with giving back or paying it forward. I found one particular one that is fairly active. I would encourage you to look it up and see if you can add to it. The link for the Pay It Forward Morongo Basin group is https://www.facebook.com/groups/557345691278803.
It’s Tutorial Thursday! Today I want to show you how to create wobbler and slider cards.
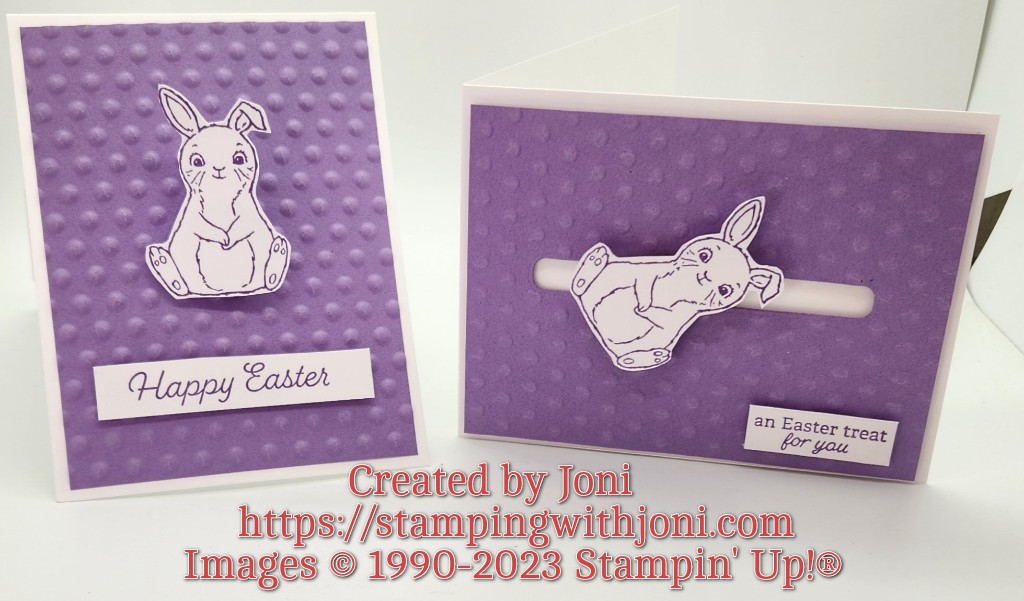
Here are the photos of the cards.
For both of these cards the base is Thick Basic White Card Stock cut to 4 1/4″ X 11″ with the Paper Trimmer. Then on the 11″ side it is scored at 5 1/2″.
The mat is Highland Heather Card Stock cut with the Paper Trimmer to 5 1/4″ X 4″. It is then embossed with one of the Basic 3D Embossing Folders from the Online Exclusives.
For the Wobbler Card two 1″ circles are punched out from the Highland Heather Card Stock and have a hole punched in the middle with the Take Your Pick Tool. About 5″ of wire is wound around the tool and then thread through the hole and secured with Tear & Tape Adhesive on both sides. Stamp the bunny and sentiment with Highland Heather Ink on a scrap piece of Basic White Card Stock. Cut out with Snips. Attach the bunny to one circle and then then other circle to the base of the card. Then attach your sentiment with Dimensionals.
For the Slider Card cut a “window” with the coordinating die from the Cracker & Treat Box Dies. The window is about one and a half lengths of the die. Then take two pennies and sandwich a Dimensional between the window to create a track. Tip: Cut the points off the Dimensional first. Then stamp a bunny and sentiment with Highland Heather Ink on a scrap of Basic White Card Stock and cut out. Attach the bunny to the penny with either Mini Glue Dots or a Dimensional. Then attach the sentiment with Dimensionals.
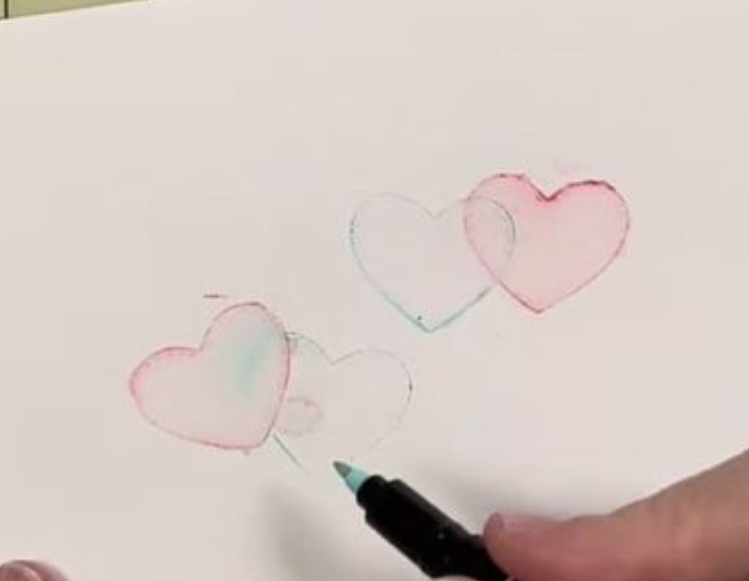
It’s Wacky Wednesday where a product is used in a way it is not intended!
Did you know that you could use your dies to ink an image? Simply dip your dies with the raised side down in your ink very gently. Then take a tweezer to lift out so your fingers aren’t dipped in ink. Finally set on to your card stock. Gently press on to the card stock to get the ink to transfer. Fill in your marker as needed.
For this Club from March 16-31 order $50 or more in product with host code UPWYJGVG or using the link https://www.stampinup.com?hostcode=UPWYJGVG. (You can also place your order directly with me but it will not be submitted until April 1.) There is no commitment unlike past Clubs. There is simply a bonus. To read more details about Club please go to https://stampingwithjoni.wordpress.com/cluborderbonus.
Open Day Session
Come on out to shop, pick up an order, say hello, or work on a project. You can also finish a DIY Kit. This is also the first day to pick up boxes (up through 3) for the Rubber Rumamage Sale.
Online Shopping
My retired stamp sets as well as finished projects are now available online! If you prefer local pick up then contact me before ordering. There is no deliver option except via shipping. Go to https://stampingwithjoni.wordpress.com/shop/ to take a look.
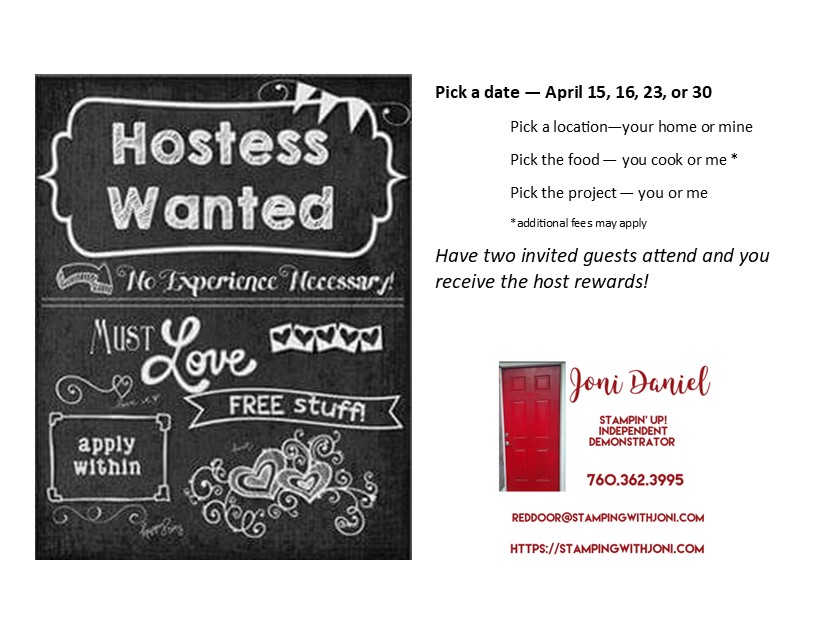
Host Availability
Are you missing in-person classes? Well, now you can choose everything. When you choose to be a host you get to pick exactly what you want: your location, your food, your projects, and your free products.
So let me know where I am going and when. I look forward to what ideas you have to share with me!
It’s Sabbath Sunday! This is the day to rest so you can be recharged for the week.
Have you noticed that if you google rest, relax, or recharge almost all of the images are of a beach scene? If it’s not a beach scene it’s someone napping in a hammock, their feet are up, doing yoga, or reading a book. The one thing in common that is displayed is calm. It looks something like this usually.
In order to fully relax you need to be calm or at peace. It’s very difficult to recharge if you are still spinning and using up your battery. And to be at peace you need to rest. I found some tips on how to relax if you are stressed that were useful.
Reserve the bed for sleep and sex only, and keep work out of the bedroom.
Keep the bedroom cool and quiet.
Develop a bedroom routine and stick with it every day.
Turn off all bright lights,including alarm clocks and phone notifications.
Avoid looking at the clock when you’re trying to fall asleep or if you wake up in the middle of the night.
I don’t know about you but many of these guidelines I do not follow. I would probably sleep better if I did. Which of these tips are you breaking? Which will you implement?
Just a reminder that the Last Chance List will go live on March 29. But before this, please pay attention as some items are on low inventory, such as many of the In Colors that are going out, and will be gone forever. This may occur even before the Last Chance List is out.
It’s Friendship Friday! This is the day to focus on giving back or paying it forward.
Have you ever listened to someone’s success story? They go on about how they grew up, big challenges they’ve had, and so forth. But, often, the moment that changed things around is often little. The gentleman smiled at me. My mentor said I was a powerhouse. My teacher sent a note. He or she stopped to talk to me and listened.
The little things matter. The moments matter. What could be seen as insignificant to you might be monumental to someone else.
I say this so when you are nudged by that still, small voice please act on it. That little gesture just might be the nudge someone else needs.
It’s Wacky Wednesday where a product is used in a way it is not intended!
Today I want to talk about kits instead of one specific product. A kit can be used when you are feeling overwhelmed to easily get something checked off of your list. Do not be afraid to create with a kit. They, for me, usually have just enough creativity to get me back moving when I feel overwhelmed.
Think of our kits as a creative boost or jump start. When your creative battery is dead the kits help to get you moving creatively once again.