Duplicate card with cutout overlay.

It’s Tutorial Thursday! Today I will give you directions for this crazy card.

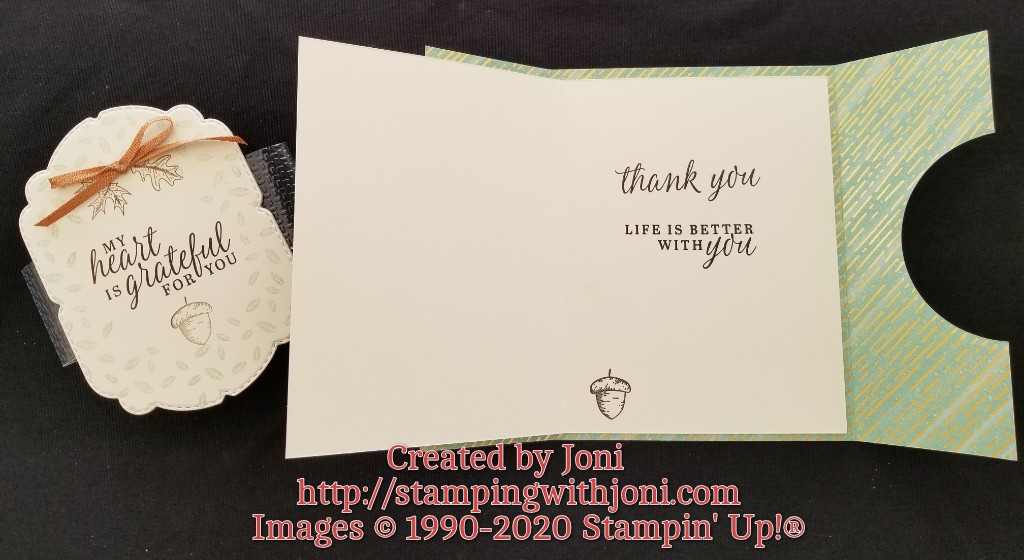
  • For the card base you will need Gilded Autumn Specialty Designer Series Paper cut to 5 1/2″ X 8 1/2″. On the 8 1/2″ side score at 2 1/8″ and 6 3/8″. Cut out semi circles for the accent portion with the Layering Circle Dies.
  • For the inner card you will need a piece of Thick Very Vanilla Card Stock cut to 5 1/4″ X 8″. On the 8″ side score at 4″.
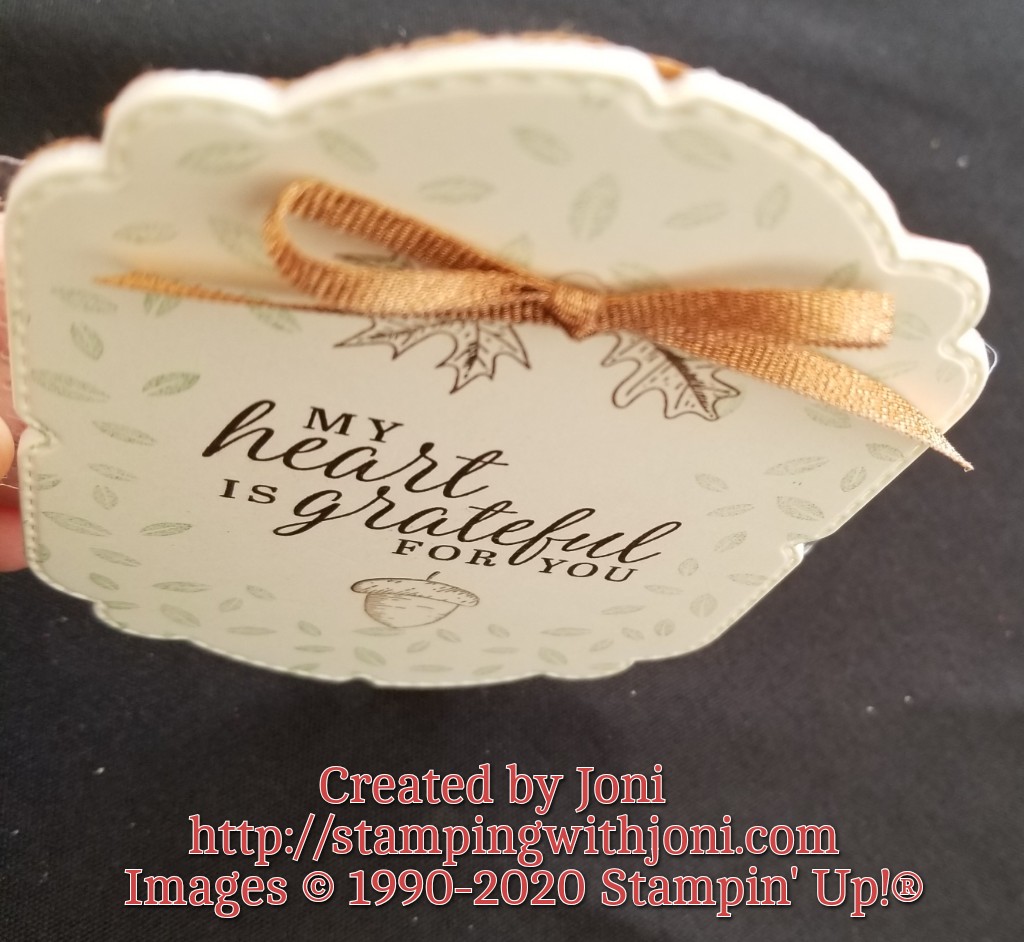
  • Out of a scrap of the Gilded Autumn Specialty Designer Series Paper cut out a circle from the Layering Circle Dies. Stamp the stemmed leaf from Beautiful Autumn Cling Stamp Set in Early Espresso Ink.
  • The belly band is cut from a Window Sheet at 1 1/2″ X 9″. Emboss with Wrapped in Texture Embossing Folders. Attach ends together with Mini Glue Dots.
  • For the accent take a piece of Foam Adhesive Sheet and peel both sides. On one side attach Very Vanilla Card Stock and on the other a coordinating card stock (in this case I used Cajun Craze). Die cut from the Celebration Labels Dies. Tip: You might need to run through twice to get it completely cut. Attach with Mini Glue Dots to belly band.

For full instructions and a video tutorial please go to https://youtu.be/_Ys5h-UAOI8.

Happy Crafting!

With inky fingers,

Joni 🙂

When leaves become flowers.

It’s Wacky Wednesday where a product is used in a way it is not intended!

Today we are using leaves to make flowers. So grab your Sunflowers Dies and let’s get started.

This is a great way to get rid of your scraps. You will need a bunch of scraps from a color family, all different colors, or all different Designer Series Papers. It’s pretty much what you want. For my sample I used four different greens…Mint Macaron, Granny Apple Green, Mossy Meadow, and Pear Pizzazz.

I used Thick Very Vanilla Card Stock for the card base, Early Espresso for the outer mat, and the Guilded Autumn Specialty Designer Series Paper for the inner mat. I do have one tip for you. Make sure to layer from top to bottom. I mean the inner layers should be on top. So as I glued I just tucked under the last layer.

Happy Crafting!

With inky fingers,

Joni 🙂

When dimensionals aren’t enough.

It’s Technique Tuesday! Today we are talking about the new Foam Adhesive Sheets. It is similar in thickness to the Dimensionals except it is a solid sheet measuring 4 1/4″ X 4 1/2″. Both sides have adhesive which makes it easy to stick to card stock, die cut, punch out, peel the backing, and stick.

So when you want a piece to not bend, stick up higher, or simply stand out more than anything else then use the Foam Adhesive Sheets. If you are curious they are on page 162 of the Annual Catalog represented as #12. If your Catalog is not within arm’s reach here is the link so you can take a look quickly, https://www.stampinup.com/products/foam-adhesive-sheets?hostcode=XUYKGUAE.

Happy Crafting!

With inky fingers,

Joni 🙂

Changes to the calendar.

It’s Management Monday! Here’s what’s happening this week.

Not much is happening this week. There have been some changes so I would encourage you to look at the calendar, https://stampingwithjoni.wordpress.com/upcoming-events/. It is current through December. Please know this does not mean there will be minor changes or additions.

One of the major changes is that Stamp of the Week is now Stamp of the Month. There will be more projects included, it will run all month, and will be sent via USPS Priority.

Open Day is happening today. Please let me know if you would like to attend either session.

Please save the date to see the new Stamp of the Month on Tuesday, September 1.

For my Team please save the date for our Team Gathering on Wednesday, September 2 at 5:30 pm.

And last, but not least, please save the date for Card Class on September 8, 10, or 12.

Happy Crafting!

With inky fingers,

Joni 🙂

There is rest in motion.

It’s Sabbath Sunday! This is the day to rest and recharge.

Sometimes when I sleep in too long I have trouble getting to sleep at night. So when that extra sleep comes I make sure to also move during the day so I can expel enough energy to need sleep.

Sometimes this looks like taking the dog for a stroll or doing a HITT workout slowly. It might mean yoga or simply stretching a bunch.

One thing is for certain that I make sure to move. Then I am not stiff from sitting too long. Also don’t do too much as to be sore and not able to sleep as well. There is a balance to everything. I would encourage you to move a little to get those jitters out.

Happy Crafting!

With inky fingers,

Joni 🙂

10 days to go!

It’s Sale Saturday and here is what is going on.

You have 10 days to redeem your Bonus Days Coupon Codes. If you have lost the email with your codes please tell me. I can get them re-sent.

Do you have your copy of the new Mini Catalog (formerly known as the Holiday Catalog)? If not, please contact me! If you have a friend that wants their own please let me know.

If you would like to order the new Stampin’ Cut & Emboss Machine you can wait until September 1 or you can sign up and get it NOW! Not only will you save a few weeks but you will also save on shipping. Let me know if you are interested.

When you place your order to get started for the holidays (Halloween, Fall, Thanksgiving, Winter, or Christmas) please use this link, https://www.stampinup.com?hostcode=BKFSKVCA which will be valid through Monday, August 24 at 7:30 pm.

Happy Crafting!

With inky fingers,

Joni 🙂

Giving back by shopping.

It’s Friendship Friday! This is the day to focus on giving back or paying it forward.

Not only are we tasked with taking care of ourselves, checking in with friends, and giving when we can but also knowing where everything comes from. Now it’s not enough to know where it was made. You also should know who exactly created it and under what circumstances.

After you purchase from whatever company do they give to somewhere else as a result of your purchase? Where does that go?

If you type in your favorite company…Bank of America, USAA, Walmart, whatever…and add foundation to the end of it you will know if they give back.

Some companies even have separate websites to help you shop philanthropically. A good example of this is Amazon with Amazon Smile. You designate who you want to donate to and every time you order the designated portion goes to that charity.

Gone are the days of just going to the corner store. The nice thing is that you can choose where to shop and where to give at the same time.

Happy Crafting!

With inky fingers,

Joni 🙂

P.S. Just a quick reminder that I am still looking for a new place to donate cards to. If you know of a place that needs cards please contact me.

Going to the beach before fall.

It’s Tutorial Thursday! Today I have two cards to teach you. Two!

The first card is just like going to the beach but without the sand in places you don’t want to think about and no frizzy hair. The second card is all about the Designer Series Paper and how it can be a border and a ribbon. So let’s begin at the beach.

For this card you will need a piece of Thick Whisper White Card Stock cut for the base as well as the Timeless Tropical Cling Stamp Set. Then you will need from outer to inner a mat of Night of Navy, Whisper White, Bermuda Bay, and Watercolor Paper. You will also need the Water Painters along with Crumb Cake, Bermuda Bay, Mango Melody, and Mossy Meadow Ink. Make sure to put water in the painter. Wash the paper to create the background and wait until dry to stamp your palm trees. Attach all with Stampin’ Seal except the Watercolor Paper. For the last layer I used Dimensionals.

For the other card for Fall I used the Gilded Autumn Suite. I started with a Thick Very Vanilla Card Base and added Cajun Craze along with the Gilded Autumn Suite. For all measurements and full instructions please check out my video at https://youtu.be/VDS1op6ku1c. (Hint, this is the card you want to pay attention to as it is the create with me project through this weekend.)

Happy Crafting!

With inky fingers,

Joni 🙂

Grid paper for more than measuring.

It’s Wacky Wednesday where a product is used in a way it is not intended!

We have used the Grid Paper for many things such as a scratch mat, taking notes, keeping adhesive off the table, or measuring a card and where the center is. But that beloved grid can also be used to see if something is straight or not.

In this case when you have a long, straight stamp do not try to place it directly on the block. Instead lay it on the grid paper to see if it is straight. Then grab a clear block and place over the stamp and push to adhere.

You will get a more level stamp than your fingers can position.

Happy Crafting!

With inky fingers,

Joni 🙂

Using blender pens to float.

It’s Technique Tuesday! Today I am talking about blender pens.

Blender pens are often used with watercolor pencils to blend the scratches of the pencils to make a fluid image. For today the blender pen is going to be used to do what it is not supposed to do…to blur the lines. If you stamp with a water-based ink then you should not use water on the image. But in this case we want to blur it a bit. We want the ink to float. This will allow the lines to soften and give a bit of a watercolor image. And the ink will continue throughout and make the ink a continuous spectrum of color.

Happy Crafting!

With inky fingers,

Joni 🙂