
It’s Tutorial Thursday! Today I want to show you how to create 3 cards with the By the Bay Suite.
The first card I am calling the fish one.

You will need:
- Thick White Card Stock cut with the Paper Trimmer to 4 1/4″ X 11″. On the 11″ side score at 5 1/2″. This is your card base.
- Cut the By the Bay 6″ X 6″ Specialty Designer Series Paper to 5″ X 3 3/4″. Attach with Stampin’ Seal to your card base. This is your outer mat.
- Cut Night of Navy Card Stock to 4 1/2″ X 3 1/4″. Attach with Stampin’ Seal to your outer mat. This is your inner mat.
- Cut Designer Series Paper with fish on it to 4″ X 2 3/4″. Stamp sentiment in Night of Navy Ink. Attach to inner mat with Stampin’ Seal.
- Then attach Flat Adhesive-Backed Pearls in the corners.
The second card is the framed landscape card.
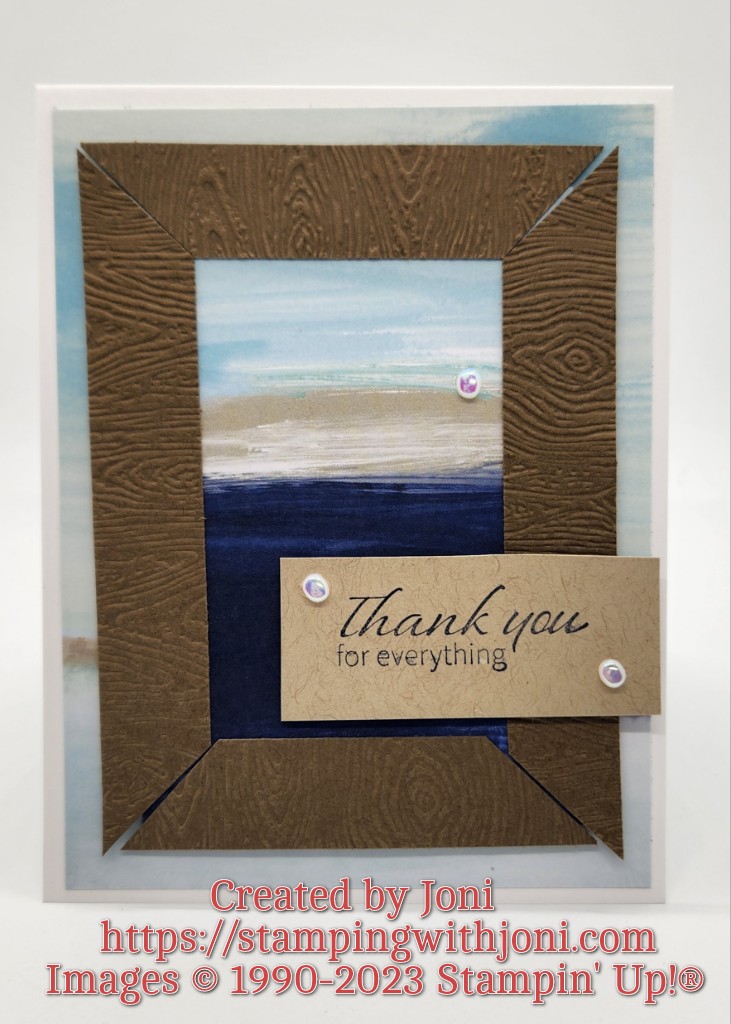
You will need…
- Cut a piece of Thick White Card Stock with the Paper Trimmer to 4 1/4″ X 11″. On the 11″ side score at 5 1/2″. This is your card base.
- Cut a piece of By the Bay 6″ X 6″ Specialty Designer Series Paper to 5 1/4″ X 4″. Attach with Stampin’ Seal to your card base. This is your outer mat.
- Cut another piece of Designer Series Paper to 4 1/4″ X 3″. Then take a piece of Soft Suede Card Stock and cut to 3/4″ X 4 1/2″ (2 pieces) and 3/4″ X 3 1/4″. Then match the corners to cut the corners. (Watch the video for this tip.) Then run through Machine with Timber 3D Embossing Folder. Attach to inner Designer Series Paper with Stampin’ Seal. Then attach entire piece to outer mat with Dimensionals.
- Then stamp sentiment on Crumb Cake Card Stock with Night of Navy Ink. Trim accordingly. Attach to frame with Stampin’ Seal, Mini Glue Dots, or Dimensionals.
- Attach pearls as wanted.
And last, but not least, the triple step card.
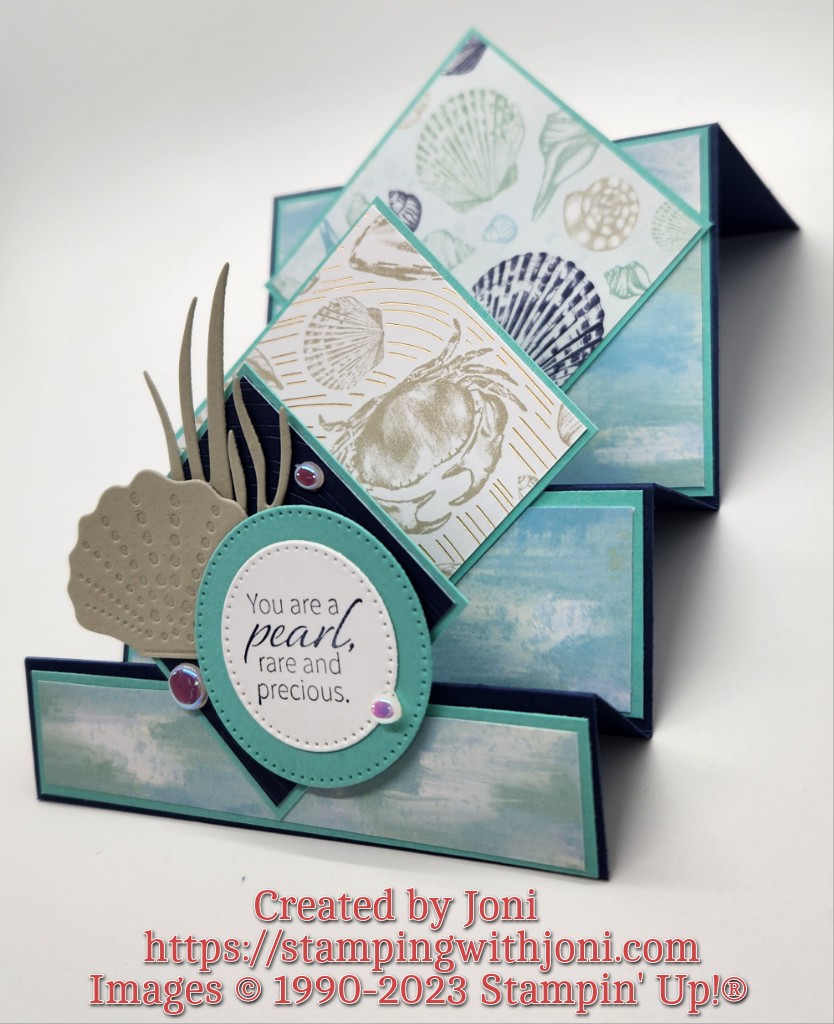
For this card you will need…
- Cut a piece of Night of Navy Card Stock with the Paper Trimmer to 4 1/4″ X 11″. On the 11″ side score at 3″, 6″, 7 1/2″, 9″, and 10″. On the 3″ score bend to form a mountain fold. Then go opposite each score when folding.
- For the diamonds you will need a piece of Coastal Cabana Card cut to 3″ X 3″, 2 1/2″ X 2 1/2″, and 2″ X 2″. For the inner mats of the diamonds you will need 3 different pieces of Designer Series Paper measuring 2 7/8″ X 2 7/8″, 2 3/8″ X 2 3/8″, and 1 7/8″ X 1 7/8″. Attach the inner mats to the outer mats with Stampin’ Seal.
- For the mats for the steps you will need a piece of Coastal Cabana Card Stock cut to 2 7/8″ X 4 1/8″ (2 of these), 1 3/8″ X 4 1/8″, 7/8″ X 4 1/8″.
- For the Designer Series Paper for the steps (you will want all one design) cut to 2 3/4″ X 4″, 1 1/4″ X 4″, and 3/4″ X 4″. Attach to all of the mats for the steps and then adhere with Stampin’ Seal to the actual steps.
- Cut a piece of Basic White Card Stock to 2 3/4″ X 4″. Stamp sentiment in Night of Navy Ink and shells with sand in Sahara Sand Ink.
- Cut out shell and grass with Sahara Sand Card Stock and coordinating dies. Then cut out a stitched circle (second to the smallest) in Basic White Card Stock with Stylish Shapes Dies. Then cut out a larger circle in Coastal Cabana. Layer all on front of the card.
- Attach pearls as wanted.
- To decorate the envelope flap to coordinate with the card please cut a piece of Designer Series Paper that matches the steps to 2 1/4″ X 6″. Attach on flap of the envelope with Stampin’ Seal. Trim with Snips.
To watch the video please go to https://youtu.be/-XuuGCnNkB8.
And to get the details about the kit that can be ordered through Sunday please go to https://stampingwithjoni.wordpress.com/diykits/.
Happy Crafting!
With inky fingers,
Joni 🙂
