
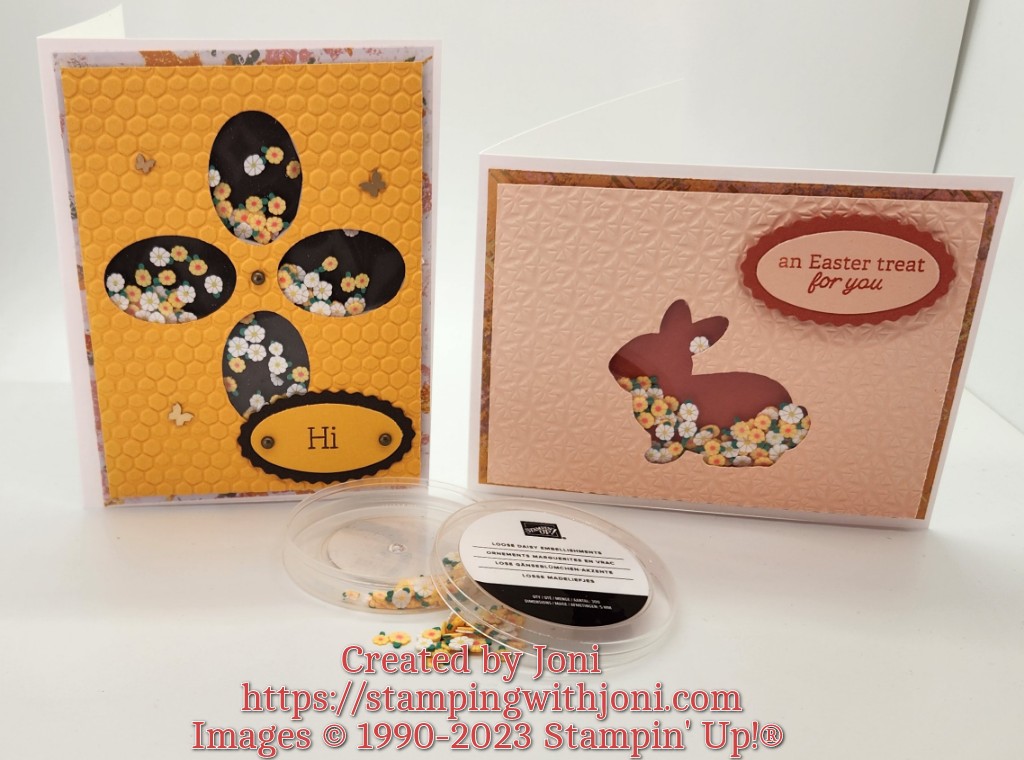
It’s Tutorial Thursday! Here’s how to make shaker cards with strange shapes.
So I should probably explain myself…strange shapes means not a circle, square, triangle. Something that has curves and weird points like a bunny or a flower.
Here is what the underneath looks like after placing the Foam Adhesive Strips.

Here are the measurements for both cards.
Bunny Shaker Card
- Cut a piece of Thick White Card Stock with the Paper Trimmer to 4 ¼” X 11”. On the 11” side score at 5 ½”. This is your card base.
- Cut a piece of Texture Chic 12” X 12” Specialty Designer Series Paper to 5 ¼” X 4”. Attach to the card base with Stampin’ Seal. This is your outer mat.
- Cut a piece of Petal Pink Card Stock to 5” X 3 ¾”. Emboss with the coordinating folder from the Basics 3D Embossing Folders. Then punch out the bunny from the Easter Bunny Punch.
- Cut a piece of Calypso Coral Card Stock and another of Window Sheet to 5 1/8” X 3 7/8” each.
- Attach the Window Sheet to the embossed pink card stock with Mini Glue Dots.
- Then outline the image with Foam Adhesive Strips to create the pocket.
- Fill in the pocket with some Loose Daisy Embellishments.
- Peel the backing off the Foam Adhesive Strips and glue down the Calypso Coral piece.
- Then place Stampin’ Seal on the back of the Calypso Coral and glue to the outer mat.
- Punch out the Calypso Coral Card Stock with the scalloped oval from the Double Oval Punch. Then punch out with the smooth-edged oval in Petal Pink Card Stock. Stamp image in Calypso Coral Ink from the Easter Bunny Photopolymer Stamp Set. Attach to card front.
Flower Shaker Card
- Cut a piece of Thick White Card Stock with the Paper Trimmer to 5 1/2” X 8 1/2”. On the 8 1/2” side score at 4 1/4”. This is your card base.
- Cut a piece of Texture Chic 12” X 12” Specialty Designer Series Paper to 5 ¼” X 4”. Attach to the card base with Stampin’ Seal. This is your outer mat.
- Cut a piece of Mango Melody Card Stock to 5” X 3 ¾”. Cut out the flower petals from the Mini Pocket Envelope Dies. Emboss with the Hive 3D Embossing Folder.
- Cut a piece of Early Espresso Card Stock and another of Window Sheet to 5 1/8” X 3 7/8” each.
- Attach the Window Sheet to the embossed yellow card stock with Mini Glue Dots.
- Then outline the images with Foam Adhesive Strips to create the pocket.
- Fill in the pockets with some Loose Daisy Embellishments.
- Peel the backing off the Foam Adhesive Strips and glue down the Early Espresso piece.
- Then place Stampin’ Seal on the back of the Early Espresso and glue to the outer mat.
- Punch out the Early Espresso Card Stock with the scalloped oval from the Double Oval Punch. Then punch out with the smooth-edged oval in Mango Melody Card Stock. Stamp image in Early Espresso Ink from the Easter Bunny Photopolymer Stamp Set. Attach to card front.
For how to put it together please reference the video at https://www.youtube.com/live/1qADIWVSfIo?feature=share.
To order the DIY Kit please go to https://stampingwithjoni.wordpress.com/diykits/. (But for quick reference, here’s the flyer.)

Happy Crafting!
With inky fingers,
Joni 🙂
