
It’s Tutorial Thursday! Today I want to show you a new fun fold and how to take your Valentine’s Day sets and use them to create something not just for that holiday.
The first card is just a neutral heart-themed background for a birthday card. And the second card is a Triple Front Fold Card.
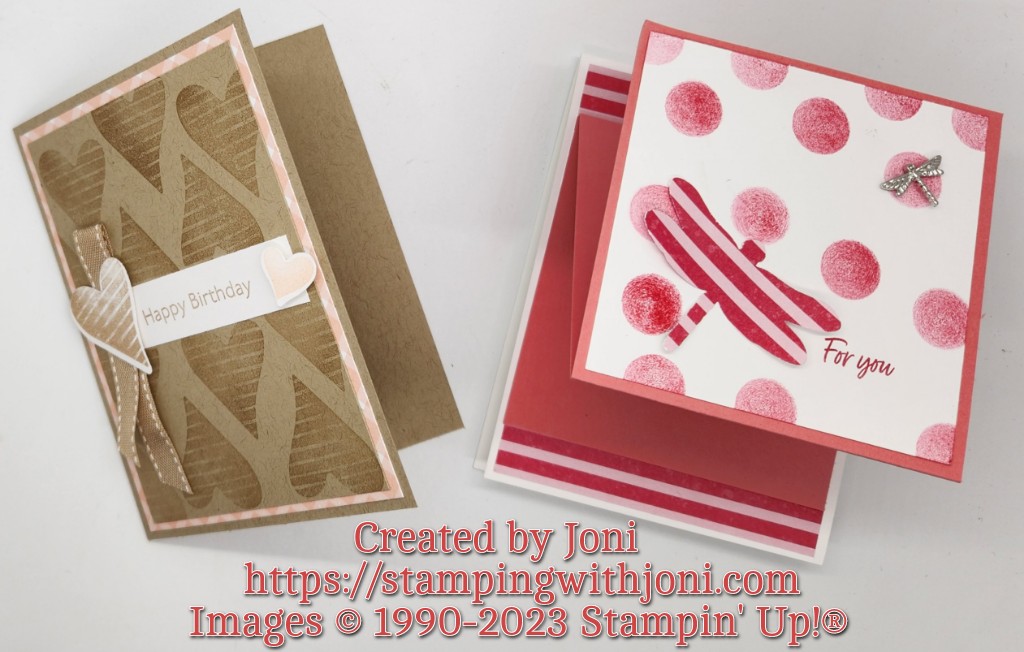
Here are the instructions for both of these cards.
Birthday Card
- Cut Crumb Cake Card Stock with the Paper Trimmer to 5 ½” X 8 ½”. On the 8 ½” side score at 4 ¼”. This is your card base.
- Cut Country Gingham 6” X 6” Designer Series Paper with the Paper Trimmer to 5 1/4” X 4”. Attach to the card base with Stampin’ Seal. This is your outer mat.
- Cut Crumb Cake Card Stock to 5” X 3 3/4”. Stamp hearts from Country Bouquet Photopolymer Stamp Set in Crumb Cake Ink. Attach to outer mat with Stampin’ Seal. This is your inner mat.
- Take a scrap of Basic White Card Stock to stamp the sentiment in Crumb Cake Ink. Trim both ends with Snips. Wait to attach.
- Stamp a striped heart on a scrap of Basic White Card Stock in Crumb Cake Ink. Punch out with the Country Bouquet Punch.
- Stamp a small heart on White Card Stock in Petal Pink Ink. Punch out.
- Cut a piece of Burlap Ribbon from the Real Red & Burlap Ribbon Combo Pack about 6” long with Snips.
- Attach ribbon to back of the large heart with Mini Glue Dots.
- Attach ribbon, large heart, and small heart to birthday pennant with Mini Glue Dots and Mini Dimensionals.
- Attach all to the inner mat with Stampin’ Seal.
Triple Front Fold Card
- Cut Thick Basic White Card Stock with the Paper Trimmer to 4 ¼” X 11”. On the 11” side score at 5 ½”. This is your card base.
- Cut Country Floral Lane 12” X 12” Designer Series Paper to 5 ¼” X 4”. Attach to card base with Stampin’ Seal. This is your outer mat.
- Cut Flirty Flamingo Card Stock to 4” X 12”. On the 12” side score at 4” and 8”. This is your triple front. Attach to outer mat centered with Stampin’ Seal.
- Cut Basic White Card Stock to 3 ¾” square. Take a Sponge Dauber dipped in Sweet Sorbet Ink to create background. Punch out the dragonfly from the Dragonflies Punch from Country Floral 12” X 12” Designer Series Paper. Attach with Stampin’ Seal. Then take a Dragonfly Trinket and roll Mini Glue Dots under each of the wings. Attach in the middle of one of the circles so it stands out. Stamp sentiment in Sweet Sorbet Ink.
To order the DIY Kit please go to https://stampingwithjoni.wordpress.com/diykits/.
To see the video please go to https://www.youtube.com/live/BnuO_z6oN5M?feature=share.
Happy Crafting!
With inky fingers,
Joni
