
It’s Tutorial Thursday! Today I want to give you directions on how to make four cards…FOUR!!! 🙂
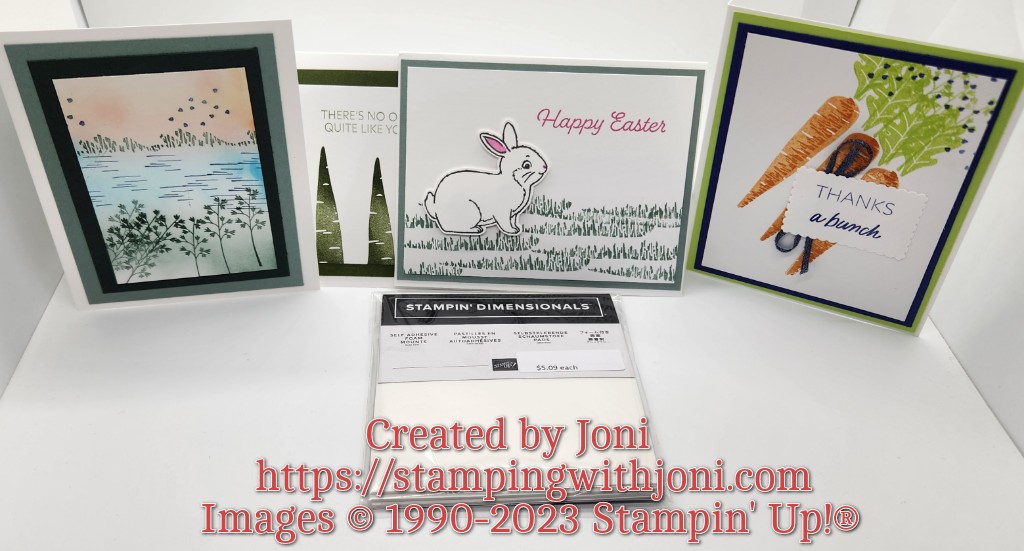
They are all easy cards but will make you think twice about all of your stamp sets. Make sure to look at your sets sideways, upside down, and right side up. There’s often surprises waiting for you. Here are the alternate cards I made with the Thanks a Bunch Photopolymer Stamp Set. Now one is more traditional (carrots), but all of the others are not.
Here are the directions for all of these cards.
Carrot Card
- Cut Thick White Card Stock with the Paper Trimmer to 5 ½” X 8 ½”. On the 8 ½” side score at 4 ¼”. This is your card base.
- Cut Parakeet Party Card Stock with the Paper Trimmer to 5 1/4” X 4”. This is your outer mat.
- Cut Starry Sky Card Stock with the Paper Trimmer to 5” X 3 ¾”. Attach to the outer mat with Stampin’ Seal. This is your inner mat.
- Cut Basic White to 4 ¾” X 3 ½”. Stamp carrots in Pumpkin Pie Ink, tops in Parakeet Party Ink, and details in Starry Sky Ink.
- Cut 1/8” Starry Sky Metallic Woven Ribbon to about 14”. Tie bow and attach with Mini Glue Dots to either side of the sentiment.
- Punch out of scrap Basic White Card Stock from the Rectangular Postage Stamp Punch and stamp sentiment in Starry Sky Ink. Attach to accent piece with Dimensionals.
Tree Card
- Cut Thick White Card Stock with the Paper Trimmer to 5 ½” X 8 ½”. On the 8 ½” side score at 4 ¼”. This is your card base.
- Cut Mossy Meadow Card Stock to 5” X 3 ¾”. Attach to card base with Stampin’ Seal. This is your outer mat.
- Cut Basic White Card Stock to 4 ½” X 3 ¼”. Stamp carrots vertically with Mossy Meadow Ink. Stamp sentiment also. Attach to outer mat with Stampin’ Seal.
Bunny Card
- Cut Thick White Card Stock with the Paper Trimmer to 5 ½” X 8 ½”. On the 8 ½” side score at 4 ¼”. This is your card base.
- Cut Soft Succulents Card Stock to 5 ¼” X 4”. Attach to card base with Stampin’ Seal. This is your outer mat.
- Cut Basic White Card Stock to 5” X 3 ¾” and stamp “grass” in Soft Succulents Ink. Stamp sentiment in Polished Pink Ink. Attach to outer mat with Stampin’ Seal. This is your accent piece.
- Stamp bunny in Basic Gray Ink and punch out. Color with Polished Pink Stampin’ Blends. Attach to accent piece with Dimensionals.
Landscape Card
- Cut Thick White Card Stock with the Paper Trimmer to 5 ½” X 8 ½”. On the 8 ½” side score at 4 ¼”. This is your card base.
- Cut Soft Succulents Card Stock to 5” X 3 ¾”. Attach to card base with Stampin’ Seal. This is your outer mat.
- Cut Evening Evergreen Card Stock to 4 ½” X 3 ¼”. Attach to outer mat with Stampin’ Seal. This is your inner mat.
- Cut Basic White Card Stock to 4” X 2 ¾”. Start at the bottom and stamp “bushes” in Evening Evergreen Ink. Take Blending Brush and color in the area. Stamp with Night of Navy Ink the “water” or “waves”. Take Blending Brush and color in the area with Tahitian Tide Ink. Stamp the “mountains” with Evening Evergreen Ink. Stamp the “birds” with Night of Navy Ink. Take Blending Brush and create sky with Pale Papaya Ink and Calypso Coral Ink. Attach to inner mat with Stampin’ Seal.
To order the DIY Kit please go to https://stampingwithjoni.wordpress.com/diykits/ by Sunday at midnight.
To see the video please go to https://www.youtube.com/live/MV9I3mkfZ6U?feature=share.
Happy Crafting!
With inky fingers,
Joni 🙂
