
It’s Tutorial Thursday! Here in the Studio it’s all about Spring!
Today’s feature is the Flowering Foils Specialty Designer Series Paper! It is gorgeous, colored or not. I am featuring two cards today. Please leave in the comments which one you like best.
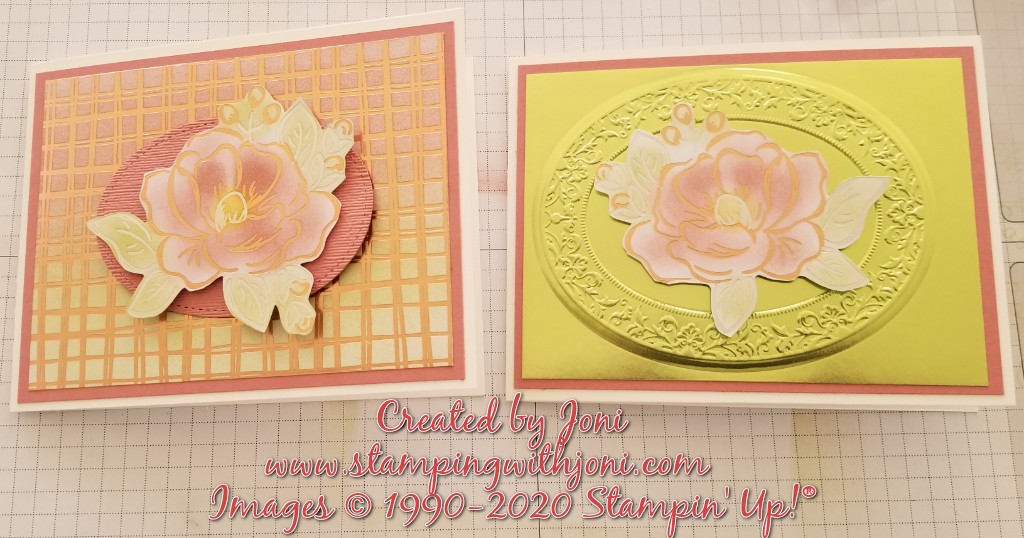
For the card on the left you will need…
- Thick Whisper White Card Stock cut to 4 1/4″ X 11″. It is scored on the 11″ side at 5 1/2″.
- Rococo Rose Card Stock cut at 5 1/4″ X 4″. Attach to the card base with Snail Adhesive. Tip: Cut out the oval before attaching.
- Cut the Foils paper at 5″ X 3 3/4″. Use a Sponge Brayer to color the background. Attach with Snail Adhesive.
- Cut out oval with Stitched Shapes Framelits and then emboss with Subtles Embossing Folder. Attach with Dimensionals.
- Cut out with Snips the flower from the foil paper. Color with Sponge Dauber with Pear Pizzazz, Rococo Rose, and Crushed Curry. Attach with Dimensionals.
- Happy Easter is stamped inside with the Welcome Easter Stamp Set.
For the card on the right you will need…
- Thick Whisper White Card Stock cut to 4 1/4″ X 11″. It is scored on the 11″ side at 5 1/2″.
- Rococo Rose Card Stock cut at 5 1/4″ X 4″. Attach to the card base with Snail Adhesive.
- Cut the Peacock Foils paper at 5″ X 3 3/4″. Run through Heirloom Frames Embossing Folder. Attach with Snail Adhesive.
- Cut out with Snips the flower from the foil paper. Color with Sponge Dauber with Pear Pizzazz, Rococo Rose, and Crushed Curry. Attach with Dimensionals.
- Happy Easter is stamped inside with the Welcome Easter Stamp Set.
For the full video on how to create these cards please go to https://youtu.be/ViW4ajQ1EZA.
Happy Crafting!
With inky fingers,
Joni 🙂

I love the one on the left!!!!
LikeLike
But there’s no bling. 😉
LikeLike