It’s Friendship Friday! This is the day to focus on giving back or paying it forward.
Today’s blog post is late simply because I lost track of time. I had a friend call and all of my responsibilities went out the window. Do you have a friend like that? Call them. Check on them.
It’s Tutorial Thursday! For today’s post you will get a bonus of two projects (and also next week).
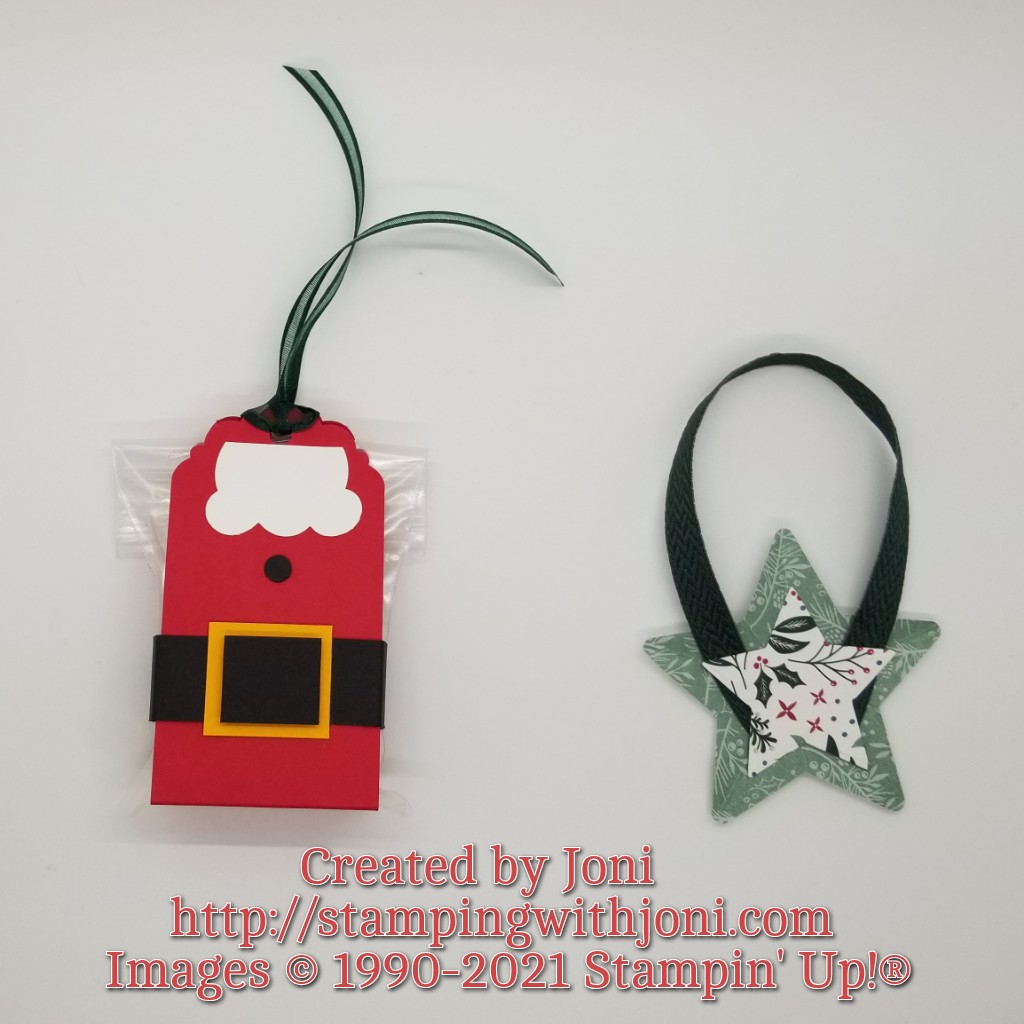
The first project is a 3D Star Ornament.
Take a piece of Tidings of Christmas 6X6 Designer Series Paper and cut out the smaller and larger plain stars with the Stampin’ Cut & Emboss Machine. The stars can be found in the Christmas Trimmings Dies.
Take the larger star only and score each point straight across to the other side.
Fold each score line at the point of the star. Do not fold all the way across at once.
Cut about 8 inches of 3/8″ Evening Evergreen Chevron Weave Ribbon. Attach with Mini Glue Dots on either side of the center of the star.
Attach smaller star with Stampin’ Dimensionals in the center of the larger star. Tip: This will cover up the ribbon ends.
The second project is the Santa Tag Treat.
Take a piece of Real Red Card Stock and cut with the Paper Trimmer to 2″ X 8 1/2″. On the 8 1/2″ side score at 3 3/4″ and at 4 3/4″. Then punch the ends with the Detailed Tag Topper Punch.
Then cut a piece of Basic Black Card Stock with the Paper Trimmer to 3/4″ X 6″. On the 6″ side score at 1″, 2″, 4″, and 5″. Place Tear & Tape on both ends and in the middle. Attach to the red piece about three quarters of the way down. This is your belt.
Cut a piece of Mango Melody Card Stock to 1 1/8″ X 1″. This is the bottom of the buckle. Attach to the middle of the belt to hide the seam with Stampin’ Seal.
Cut a piece of Basic Black Card Stock with the Paper Trimmer to 7/8″ X 3/4″. This is your buckle on your belt. Attach to the bottom of the buckle with Stampin’ Dimensionals.
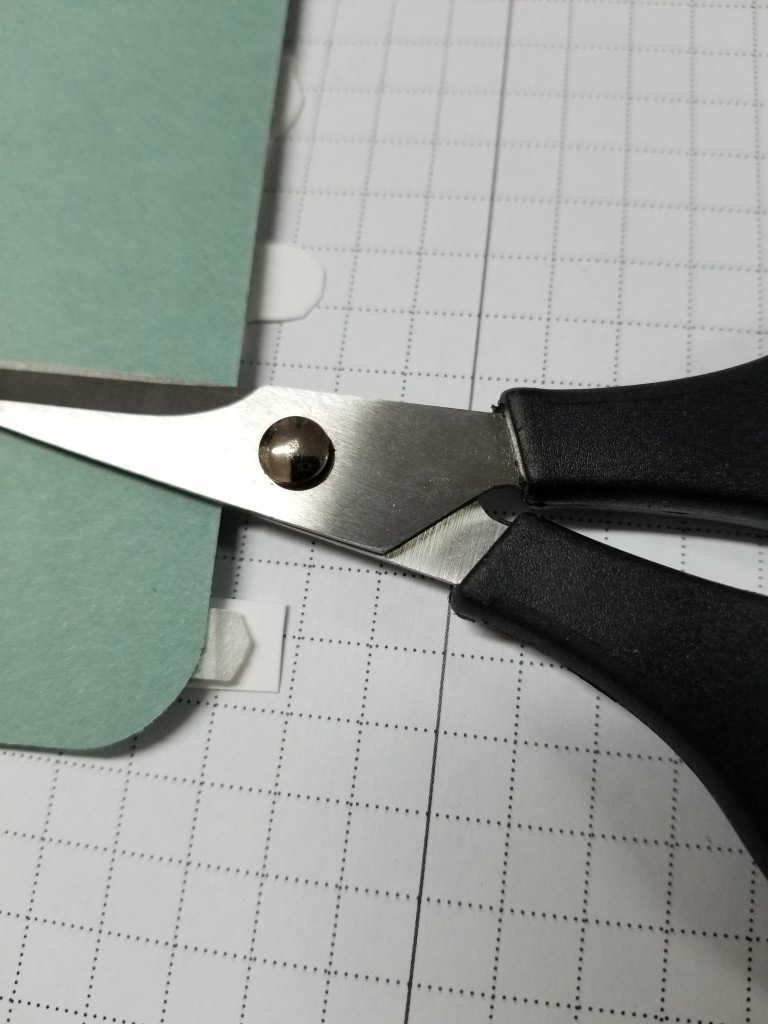
For the beard you can either use a small scalloped circle from the Layering Circles Dies or you can use the Ice Cream Builder Punch. Punch out one ice cream scoop or beard with Basic White Card Stock. Attach with Stampin’ Seal to the top just under the hole for the ribbon. Tip: Cut the top of the circle flat with the Snips so it fits better.
Cut a piece of 3/8″ Evening Evergreen Open Weave Ribbon to about 5″. Tie a slip knot, bow, or simple knot.
Punch a 1/4″ circle from the Basic Black Card Stock using a standard single notebook punch. This is your button. Attach with Mini Glue Dot.
It’s Wacky Wednesday where a product is used in a way it is not intended!
Today I am using the product, Stampin’ Dimensionals, as they are intended. What I am not doing is applying them the same way.
Have you ever stuck a Dimensional to your project only for a little bit of it to stick out? I have. Then you have the dreaded choice: leave it sticky or take the whole thing apart and try to salvage it. Well, how about the third choice? The third choice is to grab your Snips or scissors and just shave the top (or bottom) of the Dimensional off. This gets rid of the sticky part while keeping your project in tact.
It’s Technique Tuesday! While usually I give you a tip or a new way to create, today I want to tell you how to revive your dried out stamps. This only works for the red rubber ones, not the photopolymer. I am writing this now because several of you are working on (or finishing up) your Christmas cards. And I know with Christmas cards there may be certain stamps that are only pulled out for this season. If your red rubber starts to crack, look dry, or even cloudy then take a look at how to revive them.
Take two teaspoons of glycerin and add to 1/2 cup of distilled water. Mix together and pour into a shallow dish. Place your rubber stamps into the dish to soak overnight. Make sure the mixture is shallow enough to cover the rubber but not the wood mounts and/or cushioning. (Nowadays this is normally only the cushioning.) Give them a thorough rinse and cleaning in the morning, if still not soft enough you may want to give them a longer soak. Be sure you are using the plain glycerin and not glycerin/alcohol mix. If it is the mix, the alcohol dries the rubber out counteracting any benefit the glycerin has.
I hope this helps you to bring some of your stamps back to life.
Do you know that I have gift certificates? If someone doesn’t know what to get you, have them contact me. If you need a stocking stuffer for someone else contact me. And let’s face it, we know you will get this in time.
I am here and ready for you during Open Day Sessions!
The Christmas Party Invitation is out! You don’t need to RSVP to attend, but if you want a project for yourself to create please let me know.
It’s Sabbath Sunday! This is the day to rest so you can be recharged for the week.
Are you stuck in a rut? Every day you wake up and say “here we go again”. I know there have been times for me that I wake up and feel that it is the same day over and over again.
How do you get out of the rut? Well, first you need to want out. After all it is comfortable in that rut. So you want out…how do you do it? How do you climb out of that comfort zone in order to feel alive again? You do something out of the ordinary. Take a hike, a drive, call a friend, read a book…anything that is not your normal. By switching up your routine you will be able to hit the reset switch and get going again.
The Clearance Rack has been updated and the Last Chance List is happening right now! To see either of these please go to https://jonidaniel.stampinup.net/ and click on shop now.
It’s Friendship Friday! This is the day to give back or pay it forward.
Today I want to talk to you about that one “friend” or job or family member or… that you can only take in small doses and afterwards you are exhausted. Is there a reason you keep coming back for more? Part of self care is knowing who is good for you and who is not. And when you set your boundaries there are some that need to be in cement and those that can be more like temporary construction fencing.
I don’t know about you but in the last two years I have had some boundary establishment to do. Not everyone has liked it and not all are still around. But I am a much healthier person for it.
What do you need to reinforce or re-establish today?
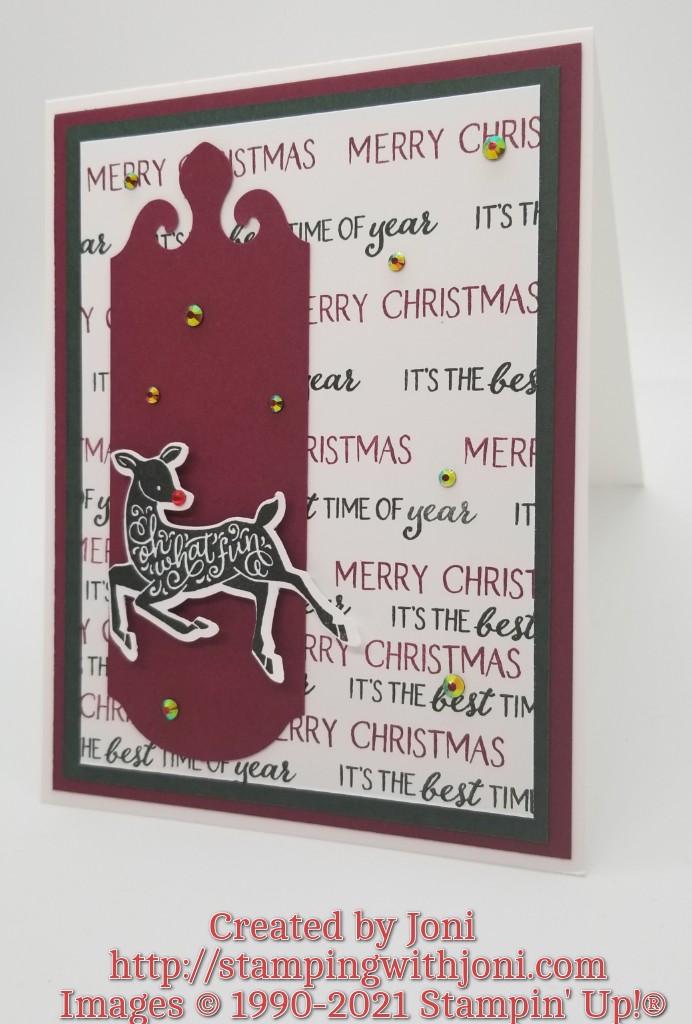
It’s Tutorial Thursday! For today’s tutorial I will explain why I am saying this is a backwards card and I will show you how to stretch a punch. So let’s begin.
Most cards have a sentiment on the accent piece and not for the background. This card has it exactly opposite or backwords. The sentiment is the background and the image is the accent piece.
And then there is the stretched punch. In order to stretch your punch you will need to measure how wide the punch is and then trim your card stock or paper just a bit under that. This is so the paper can slide through the punch and be lifted out whatever side is not being done at the time.
For this card you will need:
Thick Basic White Card Stock cut with the Paper Trimmer to 4 1/4″ X 11″. On the 11″ side score at 5 1/2″. This is your card base.
Merry Merlot Card Stock cut with the Paper Trimmer to 4″ X 5 1/4″. Attach with Stampin’ Seal to your card base. This is your outer mat.
Evening Evergreen Card Stock cut with the Paper Trimmer to 3 3/4″ X 5″. Attach with Stampin’ Seal your outer mat. This is your inner mat.
Basic White Card Stock cut with the Paper Trimmer to 3 1/2″ X 4 3/4″. Stamp with sentiment from Peaceful Deer Photopolymer Stamp Set. Alternate the sentiment and ink color. Evening Evergreen and Merry Merlot used here. Tip: Make sure to alternate the placement of the sentiments as well. Attach with Stampin’ Seal to your inner mat. This is your background mat.
Merry Merlot Card Stock cut with the Paper Trimmer to 1 5/8″ wide and at least 5″ long. Place in Elegant Punch and pull either end out of the punch. After punching then insert the other side and punch again. Attach to the background mat with Stampin’ Seal. Tip: You can also emboss with a folder to add more texture.
Stamp deer in Evening Evergreen Ink with Peaceful Deer Photopolymer Stamp Set. Punch out with Deer Builder Punch. Attach to punched image with Stampin’ Dimensionals. Place Red Rhinestone Basic Jewel for nose.
It’s Wacky Wednesday where a product is used in a way it is not intended!
Today is not too wacky but instead how to twist and stretch the punch. In this case the Elegant Punch is used to create an accent piece.
To be able to make a piece longer than the actual punch you need to trim your card stock just under the width of it. In this case the Elegant Punch measures at 1 3/4″ wide. So the card stock is trimmed to 1 5/8″. Instead of both ends being tucked in to the punch make sure you have one end sticking up to not be cut. After cutting one side then turn it around and punch the other side while the already done side sticks up.
To view how to create this card please join me on my page at 7 pm.