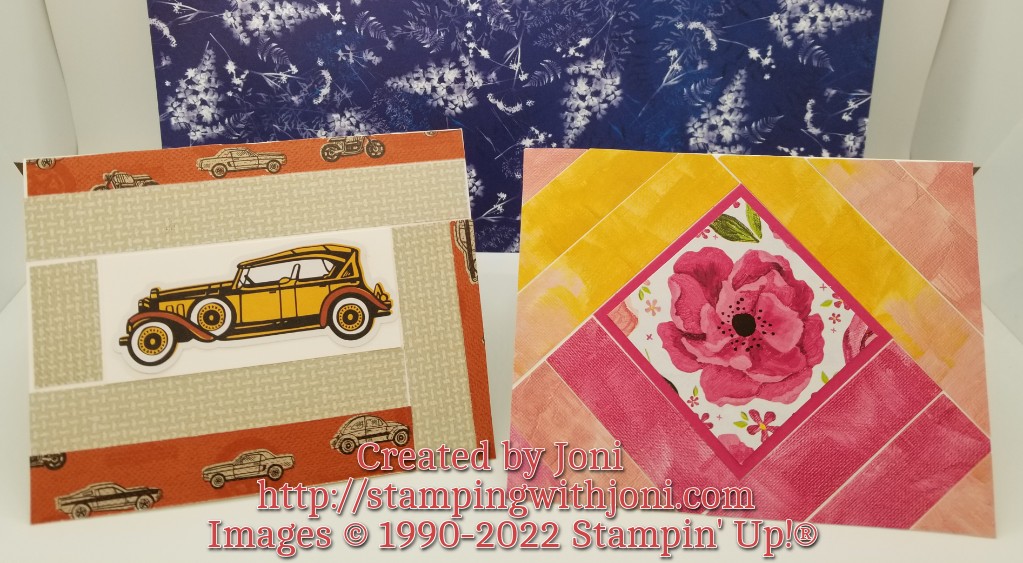
It’s Tutorial Thursday and I want to show you how to “quilt”! Quilt is in quotes because it is a very loose translation of the original term of quilting. I will not be measuring but I will be trimming and creating a pattern similar to that of a quilt.
For this card you will need a center, accent, or focal point. After the focal point you will need strips cut any width you like. I would not recommend going smaller or more narrow than 1/2″ since they get difficult to work with. For the sample here the strips are cut to 3/4″. You will also need adhesive (Stampin’ Seal) and a card base. There is no ink, embossing, or stamping to create this project.
It’s Wacky Wednesday where a product is used in a way it is not intended!
Did you know that besides burnishing score lines the Bone Folder has many uses? It can curl flowers, flatten items, create gaps for 3D projects, and more. My favorite lately is an envelope stretcher.
You know how you create a card and you think there might be a couple too many layers to it. Well, then stretch your envelope. Take your Bone Folder and slide into an envelope. Then move slowly and twist a little to create a bit of a gap in your envelope. This will allow that unwieldy card to slide right in.
It’s Technique Tuesday! Today is not so much of a technique but a gentle reminder.
It does not matter how much you learn if you don’t create. With practice you get dexterity both with your fingers and your tools. So go practice! Go create!
Here’s some good news for you! If you do not live in the Morongo Basin and you requested a catalog or ordered from me since December 1 it is in the mail TODAY! I am ahead by a day or two. 🙂 So instead of them going out by Wednesday you just might receive it by then.
So what’s your favorite part of the weekly newsletter? You will get three tickets per comment in to the raffle to have a chance to win the In Color Ink Pads on May 2.
When you would like to order please consider qualifying for the Club order. For this Club from April 16-30 order $50 or more in product with host code CDY4KJRK or using the link https://www.stampinup.com?hostcode=CDY4KJRK to qualify. (You can also place your order directly with me but it will not be submitted until May 1.) There is no commitment unlike past Clubs. There is simply a bonus.
I am open today for Open Day sessions.
Plan on coming out on Saturday, April 30 for the Re-Rummage Sale! All proceeds will go to Operation Gratitude so they can continue to do care packages for deployed military and first responders. This is a one-time event!
And if you didn’t know, this is the start of the new year for you! This is when the Open House has just finished, all the VIP’s have been recognized, and now it’s time to start over. So would you like to be a VIP?
Here’s what this means…extra gifts during the Open House, first call for BOGO, priority shopping for the Rubber Rummage Sale, and more!
So how do you become a VIP? Glad you asked.
Host a class. Any of my classes except craft class are up for a host. So if you see something you like or want something extra just tell me. The location is up to you, projects are up to you, and the food too! All that is required is that you invite and that two crafters actually attend.
Order $150 or more in product in one order.
Join my Team. That doesn’t mean you have to do classes, fairs, or events. There is no risk, no credit checks, and you don’t pay shipping or tax (since you have a 20% discount). So…the catch…oh yes, buy (or sell) $300 of product per quarter. That’s it. For more details please go to https://stampingwithjoni.wordpress.com/benefits-to-being-a-part-of-the-team/.
Let me know what version of VIP looks like for you!
It’s Sabbath Sunday! This is the day to rest so you can be recharged for the week.
I want to say thank you to everyone that came out yesterday. And if you haven’t checked the post from yesterday please do. I have two tickets that haven’t been claimed.
But, as I was saying, thank you for coming out yesterday. I enjoyed every minute of it. But I have to admit that a little after 3:00 I crashed. That bed was calling my name and I took a nap. And after that nap I ordered a pizza and ate my slices off a paper plate. No dishes and rest makes for a heavenly evening.
And today I will finish the clean up.
I say this to ask you how do you rest? Do you put your feet up or do you go for a hike, to watch a movie, take a drive, what allows you to rest?
Thank you for coming out to the Open House today! For those of you that came you were issued a ticket to have a chance to win your choice of Designer Series Paper.
Please post in the comments a picture of your matching ticket to claim your prize. You have until Monday, May 2 to tell me which paper you would like. Congratulations!
The Last Chance List is out! To view the list please go to https://jonidaniel.stampinup.net/ and click on shop now. Please remember that all items are while supplies last.
If you would like to order online please use the link https://www.stampinup.com?hostcode=CDY4KJRK. This is the link to qualify for the Club order. This link expires Saturday, April 30.