
If one isn’t enough, how’s two FREE projects for tomorrow’s Open House! This cute pocket is easy and sealed. Come to make one for FREE!

See you tomorrow!

Happy Crafting!
With inky fingers,
Joni 🙂
If one isn’t enough, how’s two FREE projects for tomorrow’s Open House! This cute pocket is easy and sealed. Come to make one for FREE!
See you tomorrow!
Happy Crafting!
With inky fingers,
Joni 🙂
It’s Friendship Friday! This is the day to focus on giving back or paying it forward.
I have to say that I have a couple of friends that without hesitating will ask what is needed before I sometimes even know. They are few and far between but so necessary.
They are the ones that post a little funny something on facebook and tag you in it. When you open it you know exactly why they tagged you and probably laugh a little more than you should.
They are the ones you call when you are exhausted and know they are too. This is when the chips and salsa are usually calling our names.
So who comes to mind? Give them a call, mail a card, or simply stop by. Don’t forget to appreciate them.
Happy Crafting!
With inky fingers,
Joni 🙂
I thought you would want to know what you are creating on Saturday! This project uses new stamps, new dies, and new ombre paper! It’s gorgeous in the photo but even better in person.
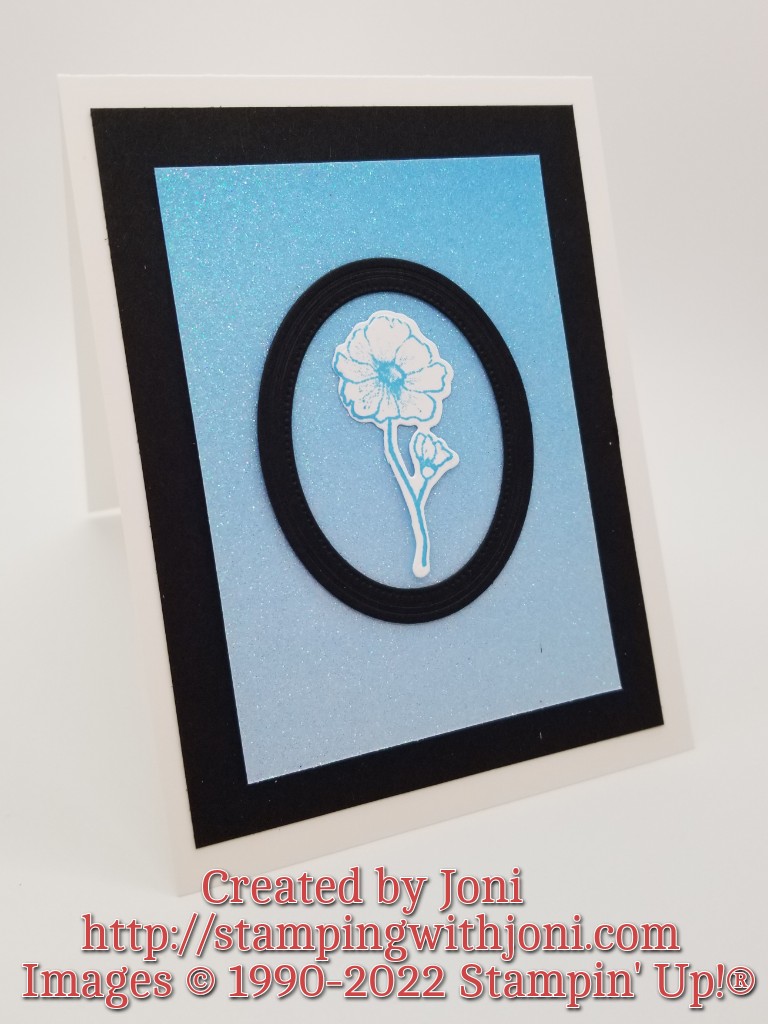
Come for the glitter and stay for the fun!

See you Saturday!
Happy Crafting!
With inky fingers,
Joni 🙂
What do you think the free project will be for the Open House on Saturday?
Find out tonight right here!

Happy Crafting!
With inky fingers,
Joni 🙂
Don’t forget today is the day to get FREE shipping! If your order isn’t quite $75 please contact me.

Happy Crafting!
With inky fingers,
Joni 🙂
It’s Tutorial Thursday! Today I want to show you how to create simple cards. With them being simple I have the time to show you many of them.

From top left to top right and then the second or bottom row from left to right…
For more please go to the video, https://youtu.be/hpPNocB5YFc.
And remember when you watch before 10 am on May 2 remember to comment. Your comment will get you 5 tickets in the raffle to have a chance to win the 5 new In Color Ink Pads!
Happy Crafting!
With inky fingers,
Joni 🙂
It’s Wacky Wednesday where a product is used in a way it is not intended! Did you know that embossing powder can be used for more than a shiny or pretty thing? Let me explain.
Embossing powders traditionally are used to highlight or accentuate a word, flower, accent piece, etc. It is used to make something stand out. But did you know more can be done with these great powders?
It can also be used as a resist. Use a clear powder and heat. After it is cool then spread color all over using the Sponge Daubers, Blending Brushes, saran wrap dipped in ink, and so much more. After you are done with the ink then take a paper towel and clean off where the embossing powder is. You will be left with a negative image or blank spot of no ink to highlight your stamped image.
And lastly, it can be used as a border. If you are floating watercolor use the embossing powder as a border or stop for the water. This will give you a water colored image with a defined edge.
Do you have other ways to use embossing powder? Please share in the comments.
Happy Crafting!
With inky fingers,
Joni 🙂
It’s Technique Tuesday! With any good technique you need good tools. And every so often you need to do a little maintenance or cleaning.
A couple of weeks ago I talked about making sure to tighten your bolts on your Stampin’ Cut & Emboss Machine. Well, today I want to talk to you about washing your blocks.
You grab your blocks over and over again. They get adhesive, ink, skin oils, and more on them. So once in a while they need to be deep cleaned. If you notice that they have a film to them then it’s time for a dunk. Fill your sink with some warm water and dawn dish soap and give them a soak. You will want the water to just cover the blocks. Give it a couple of minutes and then rinse and dry. When drying make sure to dry with something as lint free as possible.
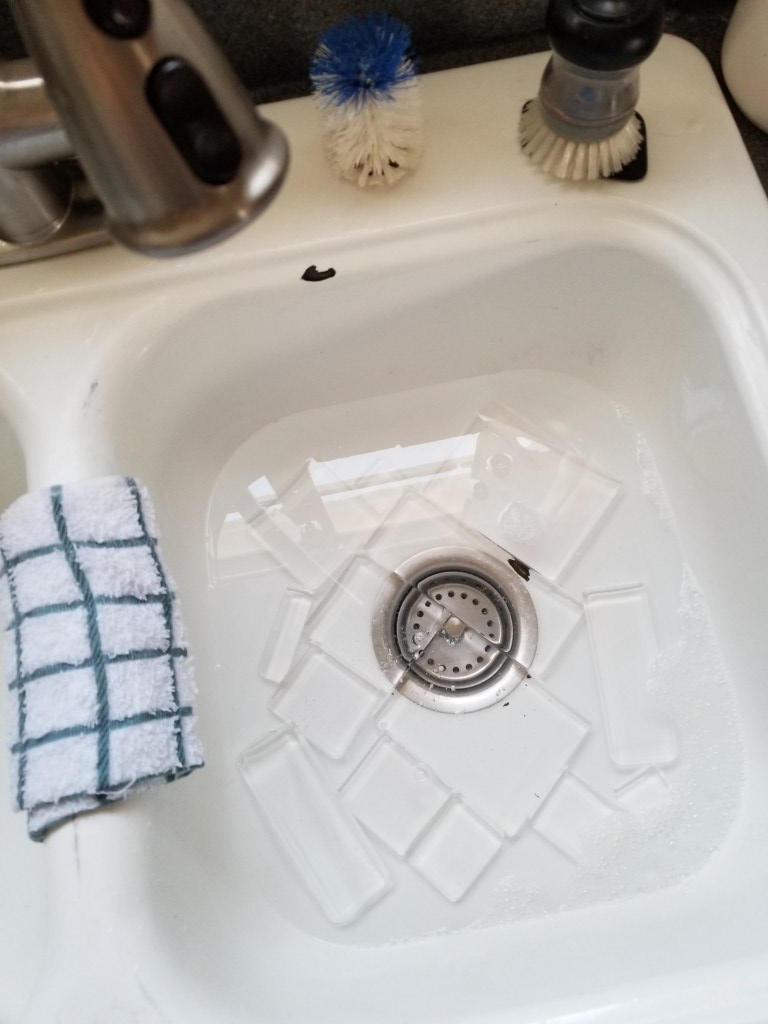
In between washing them you can spot clean with a microfiber cloth (like what you use for your glasses) and some hand sanitizer.
Happy Crafting!
With inky fingers,
Joni 🙂
It’s Management Monday! Here’s what’s happening this week and maybe a bit beyond.
The BOGO guidelines were emailed on Friday. If you missed them here is the link, https://mailchi.mp/05caa16b4388/bogo-guidelines.
Later today I will be emailing the list to Gina for her to pick her one FREE item from last week’s Facebook Live. Wednesday I will be emailing VIP and Team and on Friday to all Crafters. Plan on coming to the Open House (details below) to shop in person on Saturday.
When you would like to order please consider qualifying for the Club order. For this Club from April 16-30 order $50 or more in product with host code CDY4KJRK or using the link https://www.stampinup.com?hostcode=CDY4KJRK to qualify. (You can also place your order directly with me but it will not be submitted until May 1.) There is no commitment unlike past Clubs. There is simply a bonus.

I am open today for Open Day sessions.

The invitation is out for the New Catalog Open House and BOGO Sale! No RSVP is needed! If you want to create please let me know that you are coming.
Save the date for Saturday, April 30 for the Re-Rummage Sale! All proceeds will go to Operation Gratitude so they can continue to do care packages for deployed military and first responders.

Happy Crafting!
With inky fingers,
Joni 🙂
It’s Sabbath Sunday! This is the day usually to rest so you can be recharged.
Well today is going to be a bit different for me. You see it’s been spring break for my daughter so I took a day or two to have some fun during the week to see her. So today is a bit of a work day for me. A slower work day but still a bit of one. And yes also cooking for Easter.
Sometimes you have to do a bit so you can be ready for the week and not feel really behind. So my peace is going to be found in doing a bit while in sweats today.
Do you sometimes have to push through to be able to be ready for the week?
Happy Crafting!
With inky fingers,
Joni 🙂
