If you would like to order online please use the link https://www.stampinup.com?hostcode=B2RNMTRY. This is the link to qualify for the Club order. This link expires February 15.
I am adding an event close to quite a few of you. I will be vending at the 29 Palms Farmers’ Market every first Saturday starting on February 5. This is TODAY! See you soon!
It’s Friendship Friday! This is the day to focus on giving back or paying it forward.
As my kid was growing up I would say something to her on a near daily basis. “You are special just like everyone else.” Yes you are unique but you need to realize that everyone else is too. While your perspective is yours please realize that everyone has one.
I say this to remind her to understand where people are coming from. I also say this to remind her not to compare herself to others since there really is no comparison.
I am not sure why I am writing this, but I am assuming that someone needs to hear this. Be yourself. No one else is better qualified at being you.
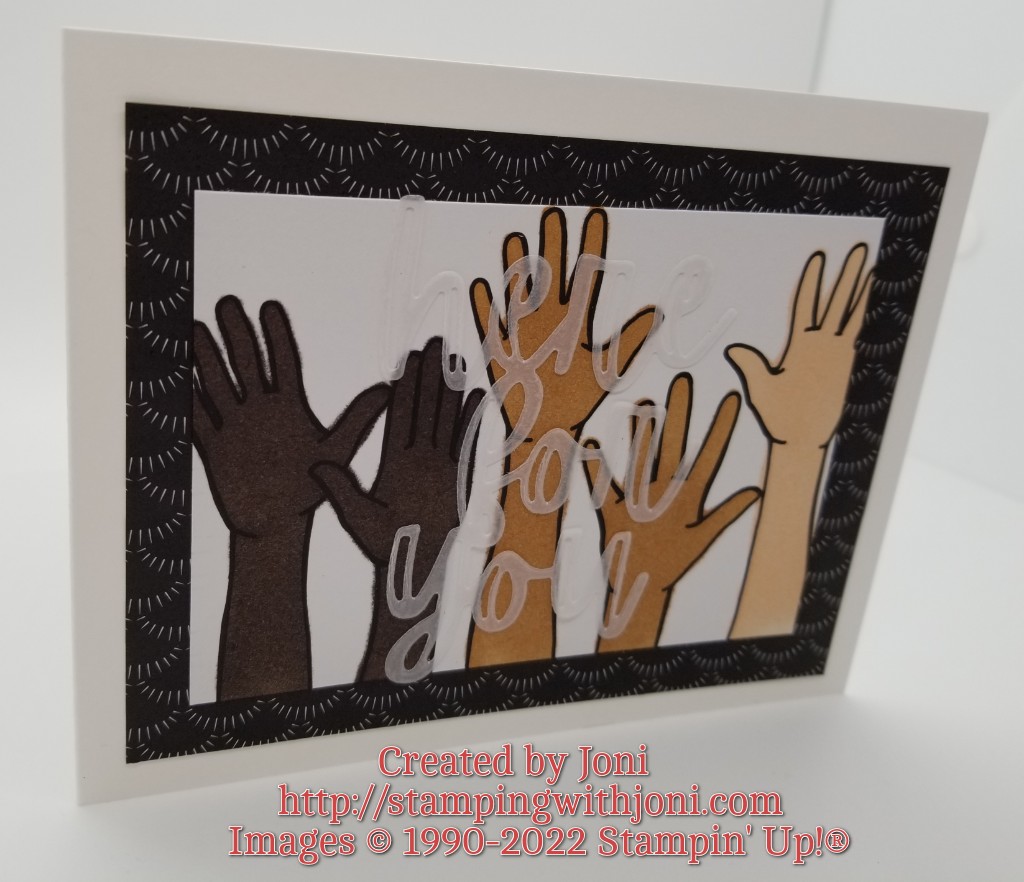
It’s Tutorial Thursday! Today I want to show you how to accent with vellum easily and without the adhesive showing through.
So let’s run through the supplies and some instructions, shall we?
Take a piece of Thick White Card Stock and with a Paper Trimmer cut to 5 1/2″ X 8 1/2″. On the 8 1/2″ side score at 4 1/4″.
Cut the All Together 6″ X 6″ Designer Series Paper with the Paper Trimmer to 5″ X 3 3/4″. Attach with Stampin’ Seal.
Cut the All Together 6″ X 6″ Designer Series Paper with the Paper Trimmer to 4 1/2″ X 3 1/4″. Color with the Natural Tones Stampin’ Blends Collection. Let dry for a minute or two, depending on how heavy you colored. Then attach with Stampin’ Seal.
Take coordinating die from Here for You Dies and cut with Stampin’ Cut & Emboss Machine. Before cutting the Vellum Card Stock make sure to attach the Adhesive Sheet to the back. After die cutting then simply peel off the back like a sticker and attach.
To see the rest of the products as well as a color chart then please go to the video at https://youtu.be/1Op6NrV7oiU.
Happy Crafting!
With inky fingers,
Joni 🙂
P.S. Just a reminder that I will be closing at noon today to celebrate our 26th Wedding Anniversary.
It’s Wacky Wednesday where a product is used in a way it is not intended!
So last night I was fixing dinner and the pan got a little too hot. The oil began to smoke. You know what that means. Yes. The smoke alarm began to chirp and then built up to a full blown scream. So I opened the door so now the neighbors know that I’m cooking. And I did what I normally do. Grabbed the Specialty Plate (gray one) and began to fan that smoke alarm to make it stop. Soon silence ensued.
Just a note…the Specialty Plate works better than the Cutting Plate (clear one). It bends less.
What Stampin’ product do you use for something other than what it was intended for?
It’s Technique Tuesday! Today I want to talk to you about embossing on foil paper. It can be done!
Last Wednesday (or even the one before) on the Live, I had someone comment (thanks Pam) and ask if heat embossing can be done on foil paper. I hadn’t tried so it was a challenge.
I grabbed a piece of Red Foil Paper (now retired) and stamped in Versamark Ink with the Tulip Fields Photopolymer Stamp Set. I had to be careful so the stamp did not slide. Since the ink did not dry as quickly as usual I stamped all of the sunrays, coated with white embossing powder, and then heated with the Heat Tool. Minus a few fingerprints and a smudge or two it was perfect.
It’s Management Monday! Here’s what’s happening this week!
When you would like to order please consider qualifying for the Club order. For this Club from January 16-31 (TODAY) order $50 or more in product with host code 99QNKBTJ or using the link https://www.stampinup.com/?hostcode=99QNKBTJ to qualify. (You can also place your order directly with me but it will not be submitted until February 1.) There is no commitment unlike past Clubs. There is simply a bonus.
Place any order with the link above and be entered to win the Calming Camellia Host Stamp Set. Only one entry per order. This is only good through tonight. Orders must be submitted by 11:59 pm to qualify.
I am here and ready for you during Open Day Sessions this morning and afternoon.
Please note that I will be closed on Thursday from noon until 7:30 pm. I will return on Friday at 9:30 am! Joel and I are celebrating our 26th Anniversary!
Join me on Saturday from 8-1 at the 29 Palms Farmers’ Market. I will be demonstrating a technique with the Blending Brushes, have Valentine’s Day kits to go or to create there, door prizes, and much more!
It’s Sabbath Sunday! This is the day to focus on resting so you can be recharged for the rest of the week.
I don’t know about you, but my body is used to moving at least every other day. So when it comes to the weekends when I take some time to not work out and rest, sometimes my body gets a little stiff. I tend to read more on Sundays so naturally my neck and shoulders are a bit tight. Here are some tips or stretching exercises to help you with your stiff neck.
If you would like to order online please use the link https://www.stampinup.com?hostcode=99QNKBTJ. This is the link to qualify for the new Club order. This link expires January 31.
For any order of any amount placed between now and January 31st using the link above you will get a ticket for a chance to win the Calming Camellia Stamp Set. Each order is one ticket or chance to win. This is my way of giving back and saying thank you for continuing to be awesome Crafty Customers! I figured I could pass along the celebration since I am within $100 of making $200K for my career sales. Thank you for getting me this far!
For my Team…when you place an order please email me the date, order number, and product total (CSV).
And, last but not least, I am adding an event close to quite a few of you. I will be vending at the 29 Palms Farmers’ Market every first Saturday starting on February 5.
It’s Friendship Friday! This is the day to focus on giving back or paying it forward.
I recently ran across this quote or story and it said everything I wanted it to. The little things matter! The little things are often what keep many of us going. Don’t underestimate a phone call, a check in, a text, or a card.
It’s Tutorial Thursday! Today I want to share with you some alternate projects (as well as the ones that are by the instructions) for the Light the Candles Card Kit. Now this kit is currently not orderable but I do have a couple that I have pre-ordered for you. Please contact me to get yours.
The first alternate project I am calling the “Bagelope” simply because a bag is created from an envelope. For this project you will need an envelope, Paper Trimmer, Mini Glue Dots, ribbon, and decorations.
Seal envelope with Tear & Tape on flap and both sides.
Trim one edge with Paper Trimmer just barely. This opening will be the top of your bag.
Score evenly on three sides. (all sides but the one you just trimmed)
Fold back and forth.
Push in to create gussets.
Flatten triangles on the bottom.
Place Tear & Tape on the triangles and then fold under.
Punch holes for ribbon and decorate as wanted.
The top can be scored just a bit if you want the top to fold over.
The second project is simply taking one of the card fronts and trimming it down to fit a box. But, here is the list of instructions for you.
When you create something similar using any of these tips please post a photo of your completed project to my page, https://facebook.com/StampingWithJoni.