Lining Up for the Punch

It’s Technique Tuesday! Today I want to show you more of a tip on how to line up your stamps when punching with one of those builder punches.

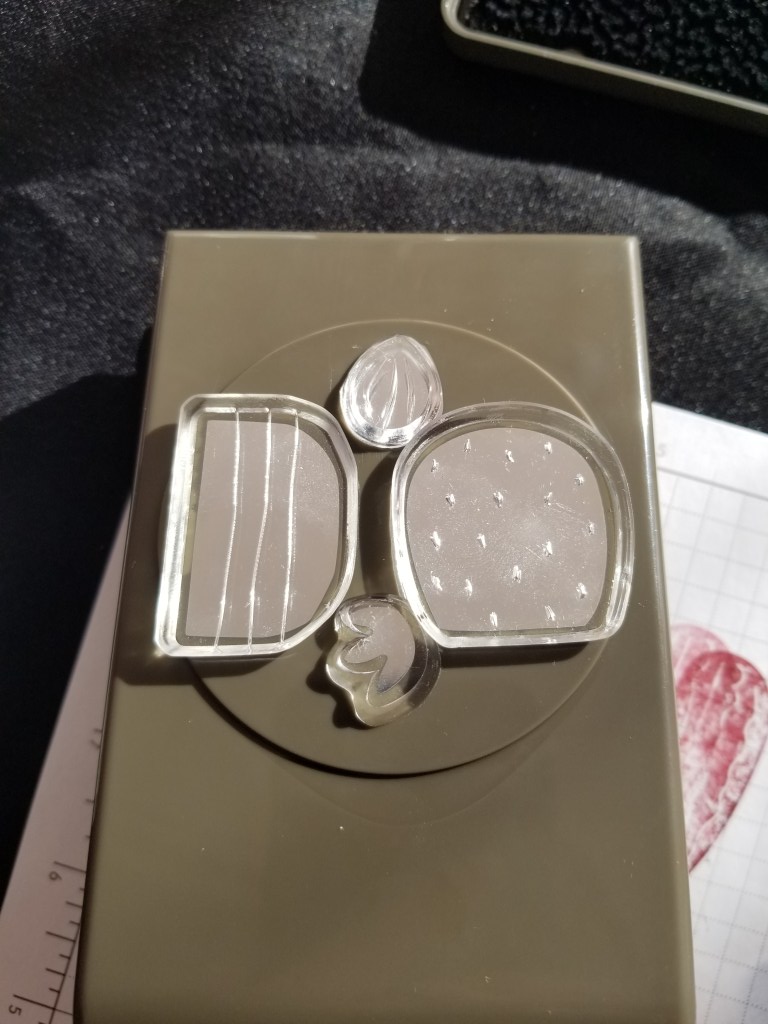
For this example I will be using the Cactus Builder Punch.

Since I figured that the stamps would be very hard to line up with the punch I did something different. I put the stamps on the punch and then put the block on top of that. This ensured that my stamps would be lined up with the punch. This also helped me to not waste time and paper.

If you use this tip please post a photo of your finished project on my page, https://facebook.com/StampingWithJoni.

Happy Crafting!

With inky fingers,

Joni 🙂

New Club Order Link is Out!

It’s Management Monday! Here’s what’s happening this week!

When you would like to order please consider qualifying for the Club order. For this Club from January 16-31 order $50 or more in product with host code 99QNKBTJ or using the link https://www.stampinup.com/?hostcode=99QNKBTJ to qualify. (You can also place your order directly with me but it will not be submitted until February 1.)

I am here and ready for you during Open Day Sessions this morning and afternoon.

Please take note that the Product Class on Saturday, January 29 has been canceled.

Happy Crafting!

With inky fingers,

Joni 🙂

Resting with Solar

It’s Sabbath Sunday! This is the day to focus on resting so you can be recharged for the week.

Have you noticed that the sun is often the answer for health?

If you need a break you go to the beach or the mountains often and enjoy the fresh air and sunlight.

When you relax at the pool you enjoy soaking up the sun even if it is just for a bit.

My Mom used to say when I had a cold to go outside and get my vitamin D.

Recently I purchased a new back up battery for my cell phone and guess what it had with it? A solar pack. So to keep the battery fully charged it needs the sun too.

Are you seeing the pattern? So if you are feeling a bit off center maybe you need a break and go catch a little bit of sunshine.

Happy Crafting!

With inky fingers,

Joni 🙂

Club is finishing tonight!

It’s Sale Saturday!

The new Mini Catalog and Sale-A-Bration Brochure are out. To get your copy please contact me.

If you would like to order online please use the link https://www.stampinup.com?hostcode=KSUXQMRQ. This is the link to qualify for the new Club order. This link expires tonight at midnight. If you want to participate please ensure that your order is submitted tonight.

To read about the new changes please go to https://stampingwithjoni.wordpress.com/rewards/.

And, last but not least, I am adding an event close to quite a few of you. I will be vending at the 29 Palms Farmers’ Market every first Saturday starting on February 5.

Happy Crafting!

With inky fingers,

Joni 🙂

Paying It Forward the Old Way

It’s Friendship Friday! This is the day to focus on giving back or paying it forward.

Have you been in line for food or drink and the person before you pays for your order? You had every intention of paying for your own order but now it is your turn to pay it forward. Instead of paying for the next person’s order can I suggest something new from an old system? Tip the barista, waiter, etc. extra instead. I know when I was making minimum wage and running up and down ladders to get shoes for people to try on a tip would have been amazing. Thank them for providing (hopefully) excellent customer service with words but also in action.

Happy Crafting!

With inky fingers,

Joni 🙂

Tulips Dies Card

It’s Tutorial Thursday! Today I want to show you how to create with these new 3D Tulips Dies.

To create the card here are the instructions…

  • Take a piece of Thick White Card Stock and cut with the Paper Trimmer to 5 ½” X 8 ½”. On the 8 1/2″ side score at 4 ¼”. This is your card base.
  • Take a piece of Bumblebee Card Stock and cut with the Paper Trimmer to 5 ¼” X 4”. Attach to your card base with Stampin’ Seal. This is your outer mat.
  • Take a piece of Flowering Fields 12×12 Designer Series Paper and cut with the Paper Trimmer to 5” X 3 ¾”. Attach your outer mat with Stampin’ Seal. This is your inner mat.
  • Take a piece of Basic White or Evening Evergreen Card Stock and cut with the Paper Trimmer to 2 ¼” X 3 ½”. This is your accent piece.
  • Cut out of Granny Apple Green Card Stock scraps backed with an Adhesive Sheet for the leaves and the stem. Stamp the leaves with Evening Evergreen Ink. Peel and stick to the accent piece. Cut out the three tulip dies from the Simply Marbelous 6X6 Designer Series Paper. Attach in order (please see video below) with Mini Glue Dots.
  • Cut a small (approximately 4″) piece of 3/8” Evening Evergreen Windowpane Check Ribbon and tie in a loose knot. Attach with two Mini Glue Dots.

To see how this is created and to see what it looks like with an Evening Evergreen accent piece and Gorgeous Grape mat please see the video at https://youtu.be/MB34inf26ZM.

Happy Crafting!

With inky fingers,

Joni 🙂

The Paper Makes the Card

It’s Wacky Wednesday where a product is used in a way it is not intended! I have to tell you something…the paper makes the card. Did you know that?

When you pick your stamps and ink, also pick your paper. Color makes or breaks a card. For example, if you create an Easter card you generally pick more subtle colors, not anything bright. So color is key.

For this card I saw the design once I saw the new paper, Simply Marbelous 6X6 Designer Series Paper. Just look at those swirls.

Doesn’t that look just like an ice cream scoop?

When you create something out of the normal please take a photo of your project and post it to my page, https://facebook.com/StampingWithJoni.

Happy Crafting!

With inky fingers,

Joni 🙂

Make a Swatch

It’s Technique Tuesday! Today I want to ask you a question. Have you ever created something and go back a few months later and wonder what you used?

For today’s technique it’s more of a tip…make a swatch or a sample. When coloring an accent piece I will make a sample palette so I can come back and make more just like it. (Now this is assuming you want to make more of this same piece.) So I stamp the image usually on Basic White Card Stock. Why? Because then my colors are true. Then I color it. But while I am coloring I am also putting a swipe of color to the side and writing what it is. That way when I go back to do it again I don’t have to rethink the entire project.

When you use this tip or technique please post a photo of your finished project on my page, https://facebook.com/StampingWithJoni.

Happy Crafting!

With inky fingers,

Joni 🙂

Do you have your catalogs?

It’s Management Monday! Here’s what’s happening this week!

The new Mini Catalog and Sale-A-Bration Brochure are live! Contact me to pick up your catalogs!

If you would like to order please consider qualifying for the new Club order. For this Club from January 1-15 order $50 or more in product with host code KSUXQMRQ or using the link https://www.stampinup.com?hostcode=KSUXQMRQ to qualify. (You can also place your order directly with me but it will not be submitted until January 16.)

I am here and ready for you during Open Day Sessions this morning and afternoon.

Please plan on attending the Team Gathering on Wednesday, January 12 at 5:30 pm on the Team group.

And lastly, the invitation is out for Craft Class this week on either Thursday or Saturday. Let me know when you will be coming.

Happy Crafting!

With inky fingers,

Joni 🙂

Actively Resting

It’s Sabbath Sunday! This is the day to focus on resting so you can be recharged for the week.

Sometimes a rest day is very inactive and sometimes it needs to be active but in a different way than the normal routine. If you have the energy then it is probably best to opt for the active rest day.

When I have an active rest day it is away from the gym. I clean the house, walk the dog, or take a hike (literally).

Here are some ideas to help you change up your routine so you can be recharged and ready to go.

  • Yoga
  • Swimming
  • Walking

To read more details and to complete the list about active resting please go to https://www.openfit.com/active-rest-day.

Happy Crafting!

With inky fingers,

Joni 🙂