
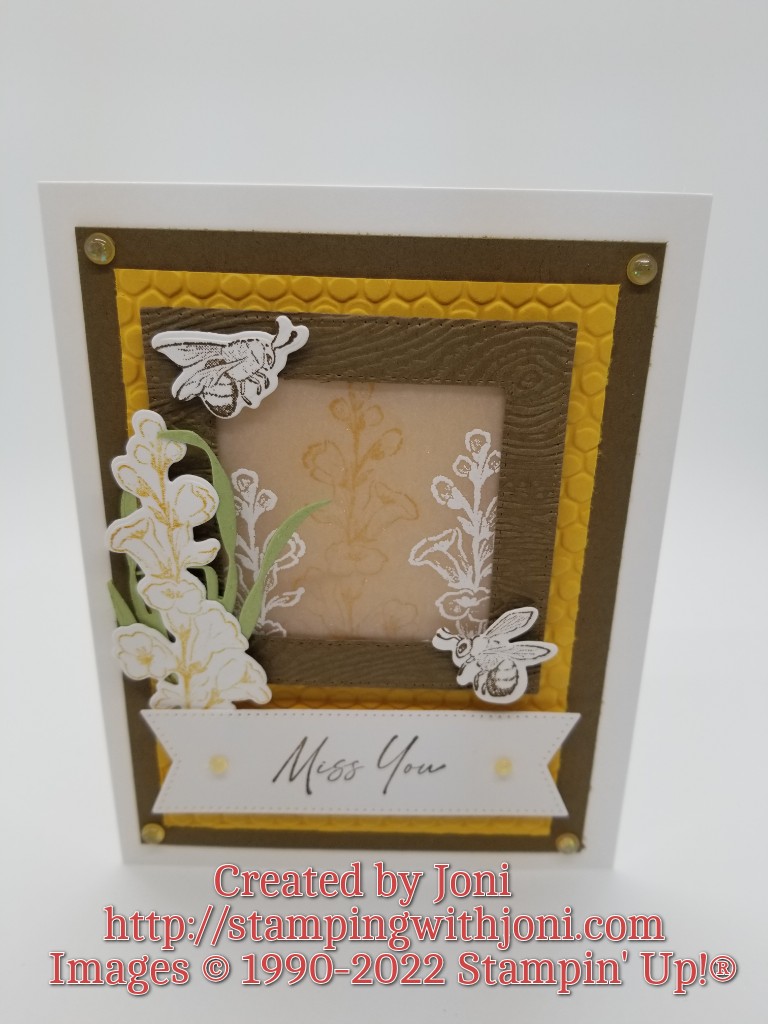
It’s Tutorial Thursday! Today I want to show you how to create a double stamped vellum card. Let’s begin!
- For the card base you will need a Thick Basic White Card Stock (Annual Catalog page 140) cut with the Paper Trimmer to 5 1/2″ X 8 1/2″. On the 8 1/2″ side score at 4 1/4″.
- For the outer mat cut the Soft Suede Card Stock (Annual Catalog page 123) with the Paper Trimmer to 5″ X 3 3/4″. Attach to the card base with Stampin’ Seal.
- For the inner mat cut the Crushed Curry Card Stock (Annual Catalog page 123) with the Paper Trimmer to 4 1/2″ X 3 1/4″. Run through the Stampin’ Cut & Emboss Machine with the Hive 3D Embossing Folder (Annual Catalog page 176). Attach to the outer mat with Stampin’ Seal.
- For the leaves behind the floral piece you will need a scrap of Granny Apple Green Card Stock (Annual Catalog page 122) cut with the coordinating die twice from the Honeybee Blooms Dies (Annual Catalog page 74). Do not attach yet to anything.
- On the Basic White Card Stock (Annual Catalog page 123) stamp the floral piece in Crushed Curry Ink (Annual Catalog page 123) and the bees and sentiment in Soft Suede Ink (Annual Catalog page 123) with the Honeybee Home Cling Stamp Set (Annual Catalog page 74). Cut with coordinating dies in Honeybee Blooms Dies as well as the Stylish Shapes Dies (Annual Catalog page 175)(back in stock the week of Sept 19). Do not attach yet.
- For the Vellum Card Stock (Annual Catalog page 140) run through the Machine with the medium sized square from the Stylish Shapes Dies. Stamp the back with the Crushed Curry Ink and floral piece. Then flip over and stamp with Versamark Ink (Annual Catalog page 129), sprinkle with white embossing powder (Annual Catalog page 128), and heat with Heat Tool Heat Tool (Annual Catalog page 128).
- With a scrap piece of Soft Suede Card Stock cut out the largest and smallest square dies from the Stylish Shapes Dies to create the frame. Then run through again with the Timber 3D Embossing Folder (Annual Catalog page 177 or for Sale-A-Bration as a $50 pick).
- Please see video, https://youtu.be/uob7QgrORVA, on how to assemble.
Here are additional supplies that were used in creating this project:
- 2021-2023 In Color Opal Rounds (Annual Catalog page 142)
- Snips (Annual Catalog page 155)
- Stampin’ Seal (Annual Catalog page 127)
- Mini Dimensionals (Annual Catalog page 127)
- Dimensionals (Annual Catalog page 127)
When you choose to create from this tutorial please post your photo of your project on https://facebook.com/StampingWithJoni.
Happy Crafting!
With inky fingers,
Joni 🙂
